Copy and Paste Graphics Commands
Navigation: User Guide ➔ Menu Commands ➔ Graphic ➔ Copy & Paste
| Insert | Edit | Delete | Copy & Paste | Display | Animation | Symbol Management | Construct |
|---|
Latest SysCAD Version: 13 May 2026 - SysCAD Build 139.37082
Related Links: Tag Copy and Paste, Graphics Symbols
Introduction
The Copy and Cut graphics commands require the user to
- Click on the Graphics Window to copy or cut from
- Select the Graphics Copy or Graphics Cut Command
- Select the graphics, including models units and pipes, that will be copied / cut.
- Press
 when done, the selection will then be copied to the Clipboard and is available to be pasted to any flowsheet within the same project, or to a different project.
IMPORTANT NOTES:
- Copy and Paste is intended for use with drawings drawn in SysCAD where the symbols used are defined in the Symbols folders and links are drawn in SysCAD.
- The user may also Paste text that has been copied to the clipboard from a text editor, such as Word, Notepad, etc.
- Animation objects, such as Dynamic Bars, Animation Tables, etc. will NOT be copied.
- You cannot paste a 'Cut' selection to a different project.
- SysCAD must be in the Edit mode (stopped) for these commands to be accessed.
Help Video
Please see Copy and Paste Video for a short video showing how to copy a flowsheet to a new graphics page in the same project.
Graphics Copy Limitations
If dxf drawings are imported and/or extensive use of the Explode and Construct Graphics Commands are used, then copying and pasting is unlikely to produce satisfactory graphics when pasted in a new graphics window. Copy and Paste is intended for use with drawings drawn in SysCAD where the symbols used are defined in the Symbols folders and links are drawn in SysCAD.
Where graphics symbols are "Not Found" and links are "Non-Standard", you can still proceed with the Paste, SysCAD will use default Symbols and default links. When Pasting, SysCAD gives a list of Not Found symbols and Non-Standard links so that you can choose to proceed or cancel and "fix" some or all of the graphics. The original graphics can be "fixed" BEFORE copying as described in Managing Not Found Symbols and Managing Non-Standard Links.
"Not Found" unit symbols and "Non-Standard" links can be found using the Symbol Management Commands.
Copy
| Command Path | Graphic - Copy & Paste - Copy |
| Short Cut Key | Ctrl+C |
This command is used to copy either a single unit, a section of a flowsheet or an entire flowsheet or Text or 'dumb' graphics symbols. The 'Copy' command opens the Copy floating toolbar:

- Select the Graphics you would like to copy by clicking on the unit once, OR
- Click on the
 in-window OR
  the cross-window button, then draw a selection window around the Graphics you wish to copy.
 - Clicked on the 'Tick' button, or press 'Enter" to complete the command.
When the selection is "COPIED", SysCAD does the following:
- Creates a copy of the graphics and model data on the clipboard
- Changes the selection to "green" colour
- The selection can be pasted onto the same flowsheet, different flowsheet of the same project or to a different Project.
- The selection can be pasted multiple times until the clipboard is emptied.
- To empty the clipboard, the quickest way is to start another graphics command, such as "Move" (and cancel).
NOTE:
- This function requires Standard SysCAD Graphics symbol (exist in the Graphics Library) and links. If the drawing contains not found symbols or non-standard links, SysCAD will replace them with default symbols and links. Warning will be given prior to paste. See Missing Symbols
- The Origin (or Insert point) button (fourth button on the floating toolbar) is optional, user can change the insert point during Graphics paste. To change the origin:
- Click on the 'Set Origin' icon.
- The mouse pointer will change to a simple cross with the word 'ORIGIN'.
- Click at the required origin point.
- The mouse pointer will change back to the default and you may continue to select units to copy or click on the 'Tick' icon to complete the Copy command.
Cut
| Command Path | Graphic - Copy & Paste - Cut |
| Short Cut Key | Ctrl+X |
This command is effectively a Move command. It is used to relocate either a single unit, a section of a flowsheet or an entire flowsheet or Text or 'dumb' graphics symbols. The content that has been cut can then be pasted (using the Paste or Quick Paste command) into the same flowsheet or to a different flowsheet, but NOT to a different project.
The 'Cut' command opens the Cut floating toolbar:

- Select the Graphics you would like to Cut by clicking on the unit once, OR
- Click on the in-window OR the cross-window button, then draw a selection window around the Graphics you wish to cut.
- Clicked on the 'Tick' button, or press 'Enter" to complete the command.
When the selection is "CUT", SysCAD does the following:
- Creates a copy of the graphics (no model data is copied) on the clipboard
- Changes the selection to "green" colour
- The selection can now be pasted into the same Project by using the Paste or Quick Paste command.
- After the selection has been pasted, the clipboard will be emptied.
- If the selection is not pasted onto the project before the clipboard is overridden, then Cut selection is reset (no change will occur in the project)
- The pasted selection retains all model configuration and solve state, no change to the project except for the relocation of graphics will occur.
Notes:
- This function requires Standard SysCAD Graphics symbol (exist in the Graphics Library) and links. If the drawing contains not found symbols or non-standard links, SysCAD will replace them with default symbols and links. Warning will be given prior to paste. See Missing Symbols
- The user does not have to select an origin point - the insertion point can be selected when pasting the graphics.
- The user may either click on the Tick button or press 'Enter' when they have completed their selection.
- The cut selection is stored on the clipboard and may only be pasted once.
- If the user wishes to paste the selection to another project, or multiple times, then they must use the 'Copy' command.
Paste
| Command Path | Graphic - Copy & Paste - Paste |
| Short Cut Key | Ctrl+V |
This command is used to paste the contents of the clipboard into a flowsheet. (This is usually executed after the user has carried out a 'Copy' or 'Cut' command.)
When the user clicks on the 'Paste' command, or enters 'Ctrl+V', the mouse pointer changes to the word 'PASTE' and they will normally see the dialog box shown below:

|
The user may select how the SysCAD unit models and links are pasted:
| |
The user may change the Insert Point of the selection:
| |
|
Pasting graphics from Copy Command
To Paste "Copy" contents onto the Graphics page, the user may:
- Select the Paste Content option that meets your requirements.
- Select the insert point from the dialog box, for example, if the insert point is centre, then click in the middle of the graphics page to insert the copied contents.
- Click on the flowsheet once to paste the copied graphics.
- After the graphics are pasted, the user may move newly pasted Graphics with the keyboard arrow keys to better position them on the graphics page, if required.
- If user did not wish to accept the pasted graphics, there is an undo button here to cancel the last paste. (For example, user may have accidentally pasted the graphics twice by double clicking, press undo once will cancel the 2nd paste).
- User can paste the selection multiple times on the same graphics page.
- The 'OK' button will remain greyed out until the user has clicked at least once on the graphics to paste the selection.
- If user wish to paste the contents onto another graphics page, please click OK to finish this session of the command first. Then go to another graphics page, activate the paste command again and repeat the above.
Pasting graphics from Cut Command
To Paste "Cut" contents onto the Graphics page, the user may:
- Select the With Configuration: "Keep All Ref Tags" option to keep all the information.
- Select the insert point from the dialog box, for example, if the insert point is centre, then click in the middle of the graphics page to insert the copied contents.
- Click on the flowsheet once to paste the cut graphics.
- The clipboard will be emptied and the paste dialog box closes automatically.
Notes:
- Hold the mouse key down to see a full frame of where the clipboard contents will be pasted - this assists with placement.
- A copied selection is stored on the clipboard and may be pasted multiple times.
- A cut selection is stored on the clipboard and may only be pasted once.
- The user may paste a copied selection to another project, but not a cut selection.
- The 'Undo' command will remove the most recently pasted instance of the clipboard. It is only available while the dialog box is open, there is no more undo if the command is finished.
Reference Tags
- Local Reference refer to Model-Units included in the copy group.
- Remote Reference refer to Model-Units NOT included in the copy group.
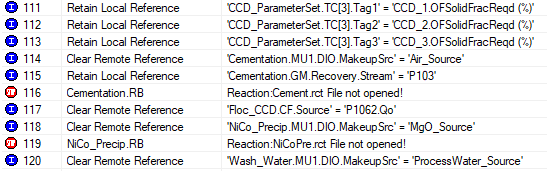
- For example, "Cementation" is using a makeup block, the makeup source (Air_Source) is on another flowsheet and is not included in the copy selection. The "Air_Source" is referred to as "remote reference". User may choose to clear the remote references by pasting "With configuration - Keep Local Ref Tags". See below for sample messages generate from the graphics paste command. Only local references are retained, the remote references have been cleared.

Examples of Reference tags are:
- General Controllers: The PGM file name
- PID Controllers: Meas_Tag, Output_Tag and SetPointTag
- SetTag Controller: The Meas.Tag, if used, and Tag1, Tag2, etc
- The General Model (GM) sub-model in Tanks and Ties
- Feed and Sink cross-page: connection tags, reference tags if Operation type is set to Stream Fetch, Makeup Source Fetch or Link to Makeup source etc.
- Make up and Discard sub-model: Source or Sink tags
- Simple Heater (and other similar models): If Method is set to 'DutyTag'
Reference Files
- If the copied graphics is to be placed in another project, any reference files used by the copied models (e.g.: reaction (RCT), PGM, MP, CSV files) will be copied to the new project location.
- If the reference file exists in the destination (e.g.: pasted into the same project or a file with the same name exists in the destination project), then the file will be skipped.


Paste to Multiple Graphics Pages
To Paste the contents of the clipboard to multiple Graphics pages, carry out the following steps:
- Click on the first Graphics page to make it the active page;
- Select the 'Paste' command, or 'Ctrl+V' and click on the required insertion point, or make changes in the dialog box first, if required;
- Click on the 'OK' button;
- Click on the next Graphics page (or create a 'New Graphics' page if required) and repeat the above steps.
Note:
Do NOT simply click on the second graphics page before clicking on the 'OK' button! If you do this, the first graphics page will still be the active page for the Paste command, and hence the selection will be pasted on the first page again.
Missing Symbols
If there are any missing unit symbols in the copied selection these will be displayed as shown below:

- If the user clicks the 'OK' button, these missing symbols will be replaced with the standard default symbols, i.e. the pasted graphics will be different from the copied graphics; OR
- The user may click on the 'Cancel' button and then fix the missing symbols BEFORE copying them. Please see List All Unit Symbols and Managing Not Found Symbols.
- Once the unit symbols have been fixed, the user may then copy and paste the selection.
Quick Copy
| Command Path | Graphic - Copy & Paste - Quick Copy |
| Short Cut Key | Ctrl+Shift+C |
This command allows the user to draw a selection window around the graphics to be copied. All Units, Links, Text and 'Dumb Symbols' within the selection window will be copied to the clipboard. There is no floating toolbar shown. The user may then use the 'Paste' or 'Quick Paste' commands. The insert point ("origin") for the copied data will always be in the centre.
Quick Paste
| Command Path | Graphics - Copy & Paste - Quick Paste |
| Short Cut Key | Ctrl+Shift+V |
This command is used to paste the contents of the clipboard into a flowsheet. (This is usually executed after the user has carried out a 'Copy' or 'Cut' command.)
When the user clicks on the 'Quick Paste' command, or enters 'Ctrl+Shift+V', the mouse pointer changes to the word 'PASTE'. The user may then click on the flowsheet at the origin position for the copied (or cut) selection.
Units will be pasted together with their configuration, e.g. feeder species composition, this will be included in the pasted unit.
Notes:
- Hold the mouse key down to see a full frame of where the clipboard contents will be pasted - this assists with placement.
- A copied selection is stored on the clipboard and may be pasted multiple times.
- A cut selection is stored on the clipboard and may only be pasted once.
- The user may paste a copied selection to another project, but not a cut selection.
- There is no 'Undo' command
- The quick paste will paste "With configuration" and with all reference tags.
Copy bitmap
| Command Path | Graphic - Copy & Paste - Copy Bitmap |
| Short Cut Key | Ctrl+Alt+C |
This command will copy the graphics window contents as a bitmap to the clipboard. This can then be inserted into another file, such as an Excel spreadsheet, Word document, etc. The command takes a "print screen" of the graphics page, and then changes its colour to mono with black lines and white background.
Notes:
- Since this is a screen print, it will copy whatever is displayed on screen. Therefore ensure that the entire graphics page is visible on the screen. If only a section of the graphic page is required, use the zoom command to display the required graphics before copying the bitmap.
- It is recommended to increase the size of the graphics window, while keeping the aspect ratio, before copying for best quality image.
- Printing Header can be customised, this is done via General Options - Graphics - Title Text for Print Graphics.
- For some users this doesn't always copy a clean picture, in this case, recommend using MS Snip & Sketch to make the screen print.