Class
Navigation: PGMs ➔ Classes
| Functions | Subroutines | Classes | |||||
|---|---|---|---|---|---|---|---|
| Defining a Function | Predefined Functions | Tag Functions | Mathematical Functions | String Functions | Defining a Subroutine | Trigger Subroutines | Defining a Class |
Related Links: User Defined Class and Functions, Example PGM Files
Global Predefined Class Instances: Species Database Class, Particle Size Definition Class, Plant Model Class
Predefined Classes: Array Class, StrArray Class, Matrix Class, TagSelect Class, Noise Class, TimeClass
What is a "Class" and when should it be used
A Class will allow a user to define a group of variables and functions/subroutines. The class definition is then used to make any number of "instances" or "objects" based on the class definition (or "class template").
- For example, a user may want to extend the functionality of the Tank and turn it into a complex type of tank (for example, CSTR). For this type of tank, the user may define additional user variables, then define some correlations (functions or subroutines) to perform the additional calculations.
- If the code is written without the use of a class, the user will need to write the same code each time a CSTR tank is used. This can lead to repeating the same code a number of times depending on the number of CSTR tanks in the project. It is also difficult to maintain because any change in logic needs to be made in all repeated code.
- If the code is written in the form of a Class, then the user can define all the Variables and Functions required as a template - "CSTR_Class" (class definition), then instruct SysCAD to use this template to create as many "instances" or "objects" of type CSTR_Class, then use these to perform the CSTR calculations (n times) without the need to repeat the code.
- Some example PGM files contain user defined classes, please see User Defined Class and Functions for some examples.
How to Define a Class (Class Definition)
Syntax for Class Definition
Class className

;Variable declaration(s)

;Sub(s) and Function(s)

EndClass
|
|
Special Functions
These Special Functions are available for use within class functions and subroutines:
ClassName(): returns a string of the class type name. In example below, this will return "CSTR_Class".ClassTag(): returns a string of the class instance variable name (tag). This is a particularly useful function when the class instance variable name matches a tag in the model.- For example, we can use "UnitTag = ClassTag()" within an "Init()" Sub for the class. See Example Class Definition File
Formatting Keywords
Available from Build 139.32530. The following optional formatting keywords can be added in the Class definition. They are used to help manage how the class instance and its variables are displayed in the Access window. See Class Instance Variable Display Options for more information.
General keywords:
ClassAsGroup: If this keyword is included within the class definition, then later when class instances are declared they are automatically displayed as a group in the Access window.ClassAsPageLabel: Available from Build 139.31388. If this keyword is included within the class definition, then later when class instances are declared they are automatically displayed on a new tab page in the Access window, with the page name matching the class instance name. The user does not need to specify PageLabel(xxx) for each class. It is also useful for each class instance in an array of classes appearing on a new tab page.ClassAsTextLabel: If this keyword is included within the class definition, then later when class instances are declared they are automatically displayed with a text label (heading) in the Access window, with the text label matching the class instance name.
Grid display keywords:
ClassGridColumnWidth Width: Use this to change the default width of each column displayed in a class grid.ClassGridMaxColumns MaxColumns: Use this to change the maximum number of columns allowed before a new grid is automatically created.ClassGridHideComment: Use this to hide the display of class instance comments, that are normally displayed in the first row of the grid.ClassGridHideText: Use this to hide the display of all TextLabels shown as text between rows in the grid.
Instead of using the above formatting keywords within the class definition, they can be included within {} when defining the class name. The full keyword or shortened formats can be used. These are ClassAsPageLabel|AsPageLabel|pl, ClassAsTextLabel|AsTextLabel|tl, ClassAsGroup|AsGroup|g, ClassGridColumnWidth|ColumnWidth|Width|cw, ClassGridMaxColumns|MaxColumns|mc, ClassGridHideComment|HideComment|hc ClassGridHideText|HideText|ht.
Example: class TankClass{g,pl,cw(12),mc(6)}
Other Functions and Keywords
Other functions and keywords are available when using the Class in the main PGM file. These are described in the How to use the Class section.
Functions include:
- ForEachClass Macro Function: used to call subroutines for all instances of the class. See ForEachClass Function for more details.
- ExcludeClass Used to block class from use in ForEachClass. Commonly used to block instance at index 0 in an array of classes.
Keywords include:
- ClassGrid: used to display class instances in a table layout. Available from Build 139.32360.
- ClassList: used to define a list of class instances, the list name can then be used when in other functions such as ForEachClass and ClassGrid. Available from Build 139.32394.
Example Class Definition File
- A very condensed extract of the CSTR_Class PGM file is presented below to explain the structure and use of the Class definition:
Class CSTR_Class
 ClassAsPageLabel           ;example of Special Keyword
 ;... Various Variable Definitions.....
 String     UnitTag{tag}@
 Real       TankVolume*("Vol","m^3")<<300>>
 ;... Various Variable Definitions.....

 Sub Init()
   UnitTag = ClassTag()     ; example of Special Function
   [concatenate(UnitTag, ".ResTime.Volume (m^3)")] = TankVolume
 EndSub

 Sub CalculateCSTR()
  ;......Various Calculation Code .....
 EndSub

 Sub Exec()
   ;......Various Calculation Code .....
   CalculateCSTR()                           ;Example of calling a predefined subroutine within a subroutine.
   ;......Various Calculation Code .....
 EndSub
EndClass
- The name of the Class (or template) is called CSTR_Class.
- All the variables that are associated with the CSTR_Class are defined. (The full PGM file is available in the Gold distributed example project)
- Nested functions are allowed within a class, for example Sub "CalculateCSTR" is called inside the Sub "Exec()"
- In summary, the Class(template) "CSTR_Class" contains a number of calculations and a number of Set Value Commands.
How to use the Class (Class Instances)
Syntax for Declaring Class Instances
Once the Class has been defined (template complete), the user can include this named class definition (template) in pgm files to declare any number of class instances. Class instances are then used in subsequent to code to perform calculation acting on the individual class instances. Class instances can be declared individually (in the same way normal data variables are declared) or as an array of class instances:
- Example of individually named class instances:
CSTR_Class Tank_1, Tank_2See Example - declaring class instances. - Example of Class Array:
CSTR_Class Tank[3]See Example - Declaring Class Instances in an array.
Notes:
- If the Class has been written in the form of an "include file", then we need to first add the include file into the main program by adding:
>>IncludefileName.pgmSee Example using Include File
- If you are matching the class name to the unit model tag through use of
UnitTag = ClassTag()within the class definition, then we can use the unit tag name as the class instance name.- For example, we have two tanks in the project: Tank_A and Tank_B, then we can simply declare two CSTR_class instances using the same name:
CSTR_Class Tank_A, Tank_B
- For example, we have two tanks in the project: Tank_A and Tank_B, then we can simply declare two CSTR_class instances using the same name:
- Classes can be displayed in grids in the access window using ClassGrid keyword after defining the instances. Alternatively use the # symbol or long format {ClassGrid} or {Grid} with the class type when declaring the class instances.
- For example:
CSTR_Class# Tank_A, Tank_BorCSTR_Class{Grid} Tank_A, Tank_B - Example with array:
CSTR_Class# Tank[3]{ez}
- For example:
- Classes can be added to define a list or collection of class instances using ClassList keyword after defining the instances. Alternatively use the {ClassList} or {List} keyword with the class type when declaring the class instances.
- For example:
CSTR_Class{List(Tanks)} Tank_A, Tank_B - Example with List and Grid:
CSTR_Class{List(Area2Tanks),Grid} Tank005,Tank007,Tank008,Tank012
- For example:
Performing class functions
Once the class instance has been declared, user can access class variable tags and perform the Class functions or subroutine.
- Setting a value to a data member of an instance.
- For example, we can set the UnitTag for class instance "TankA" during the "InitialiseSolution()" subroutine:
TankA.UnitTag = "TANK_A".
- For example, we can set the UnitTag for class instance "TankA" during the "InitialiseSolution()" subroutine:
- Retrieving the value of a data member of an instance.
- For example: we can retrieve a value from a class function and assign it to a variable:
ReactionExtent = TankA.CuLeachExtent
- For example: we can retrieve a value from a class function and assign it to a variable:
- Retrieving the value returned by a member function of an instance.
- For example: we can get the species index of water from the Species Database Class:
SpeciesIndex = SDB.FindSpecies("H2O(l)")
- For example: we can get the species index of water from the Species Database Class:
- Performing Class Function / subroutine calculations.
- For example, we can perform the Exec() function for class instances Tank_A and Tank_B:
Tank_A.Exec()Tank_B.Exec()
If user have declared many class instances, it will be quite tedious to define each function call separately. To execute some of these functions more efficiently, we have added some special "ForEach" macros. For example:
- ForEachSub (previously ForEachClass) Macro Function: used to call subroutines for all instances of the class.
- ExcludeClass Used to block class from use in ForEach macro. Commonly used to block instance at index 0 in an array of classes.
- ClassList Used to define a list of class instances as aa single variable and then use this with ForEach Macros and ForEach Macro Functions.
Class Instance Variable Display Options
When class instances are declared, any watched variables will be available on the access window.
- When declaring the class instances, * or @ CANNOT be appended to the class instance name.
- Class instances are automatically added to the access window.
ExcludeWatch
To hide a specific class instance from the access window display, use ExcludeWatch followed by one or more ClassNames. A comma separated list of any number of class instances, including indexed class instances of a class array can be listed.
Syntax is: ExcludeWatch ClassInstance1,...
For example: ExcludeWatch Tank[0]
ExcludeWatch is primarily used for hiding the the class at index 0 within a class array as shown in above example. From Build 139.32530 it is possible to define this when declaring the class array using {ExcludeWatchZero} or {ewz}. However because it is very common to use both ExcludeClass and ExcludeWatch, then use {ExcludeZero} or {ez}. For example:
const long TankCount = 11
TankClass T[TankCount]
ExcludeWatch T[0]
ExcludeClass T[0]
;From Build 139.32530 the above can be replaced by
TankClass T[TankCount]{ewz,ecz} ;or in full {ExcludeWatchZero,ExcludeClassZero}
;or simply the common combined form:
TankClass T[TankCount]{ExcludeZero} ;using full keyword
TankClass T[TankCount]{ez}          ;using abbreviated keyword
ClassComment
After class instances have been declared, ClassComment can be used to specify short text comments for Class Instances (similar to text comment for individual variables). A comma separated list of any number of class instances (including indexed class array instances) with text string in quotes (") can be listed. The display of the comment in the Access window depends on use of ClassAsGroup and if class is shown in Grid.
Syntax is: ClassComment ClassInstance1 "String1",...
For example: ClassComment T[1] "Feed tank"
ClassComment is primarily used for specifying comments for class instances within a class array as shown in above example. In most cases it is more common to include the comment with the declaration of the individual class instance.
For example:TankClass T1{"Feed Tank"}, T2{"Acid Tank"}, T3{"Tank 300-A012"}
General Formatting Keywords
Available from Build 139.32530. A number of different keywords in the class definition can be used to manage how the class variables for class instances should be displayed in the Access window. General formatting options:
- Use
ClassAsGroupkeyword (recommended) to use the ClassName... group heading for each class instance (and all the variables don't have the repeated ClassName.xxx). This is particularly useful together with a ClassComment for the class instances where the comment is shown in the group heading, displayed as: "ClassName (comment) ...". - Use
ClassAsPagelabelkeyword to display one Class instance per tab page. - use
ClassAsTextlabelkeyword to display the class name as a text label heading to "separate" the class instances.
ClassGrid
Available from Build 139.32530. With the keyword ClassGrid, class instances of user defined class types can be displayed in Grids (Tables) in the Access window with the class instances as columns. The ClassGrid keyword is used anywhere after class instances are declared to control where the grids are displayed. It is also possible to use the keyword when declaring the class instances.
Syntax is: ClassGrid Classes
Where Classes is a list of class instances of the same class definition. Classes can be specified in a number of different methods such as using a previously defined ClassList or list of classes similar to Classes Parameter in ForEach macros.
Example (list of class instances): ClassGrid {T1,T2,T3} (where T1,T2,T3 are previously defined instances of the same class definition)
Example (ClassList): ClassGrid L1 (where L1 is a previously defined ClassList)
Example (class definition type): ClassGrid {TankClass} (where TankClass is a previously defined Class Definition)
Example (class array): ClassGrid Tanks (where Tanks is a previously defined Class Array)
Notes:
- The width of each column can be controlled with the ClassGridColumnWidth keyword in the class definition.
- The maximum number of columns in a grid is controlled with the ClassGridMaxColumns keyword in the class definition. Additional grids are automatically created when there is a larger number of class instances.
- TextLabels within the class grid are shown as row separators, however blank lines and multiple text lines are ignored (only the last TextLabel in a sequence is shown). All text in a grid can be hidden if using keyword ClassGridHideText in the class definition.
- If comments are used for class instances, these are shown as text for each column in first row of grid. This can be disabled using keyword ClassGridHideComment in the class definition.
- If option ClassGridPageLabel is used in class definition, then the grid is displayed on a new tab page in the Access window.
- The use of ClassGrid allows positioning of display of the grid in Access window to be at any point after the declaration of class instances. To display the grid at the point of declaring the classes, use the {Grid} option or # symbol.
- Only user defined classes can be used in the ClassGrid. Predefined PGM class types (TagSelect, Matrix, etc.) cannot be used with ClassGrid.
- A class instance can only be displayed once in a grid.
ClassGrid Formatting Keywords
Available from Build 139.32530. A number of different keywords in the class definition can be used to manage how the class grid is displayed in the Access window:
ClassGridColumnWidth Width: Use this to change the default width (14) of each column displayed in a class grid.ClassGridMaxColumns MaxColumns: Use this to change the maximum number of columns (10) allowed before a new grid is automatically created.ClassGridHideComment: Use this to hide the display of class instance comments, that are normally displayed in the first row of the grid.ClassGridHideText: Use this to hide the display of all TextLabels shown as text between rows in the grid.
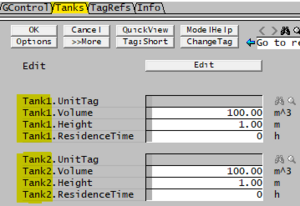
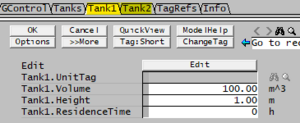
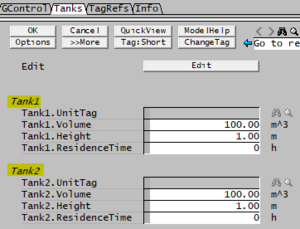
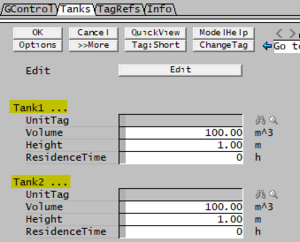
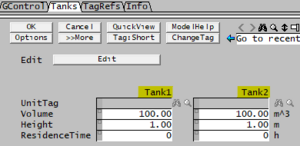
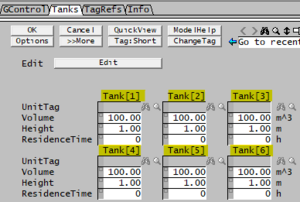
Examples
;Class PGM
Class TankClass
   ;ClassAsPageLabel
   ;ClassAsTextLabel
   ;ClassAsGroup
   ;ClassGridColumnWidth 8 ;default is 14
   ;ClassGridMaxColumns 3  ;default is 10
   ;other code here....
   String UnitTag{Tag}@
   Real   Volume*<<100>>("Vol", "m^3")
   Real	  Height*<<1>>("L", "m")
   Real   ResidenceTime*("Time", "h")
   TextLabel()
EndClass

;Main PGM
PageLabel("Tanks")
TextLabel(,)
TankClass Tank1, Tank2
;TankClass Tank[7]
;ClassGrid TankClass
;ExcludeWatch Tank[0]
;ExcludeClass Tank[0]
$
NOTE: The examples presented to the right uses different options from the above code (currently marked with ;). |
||
Sharing Classes between Projects
The recommended method of setting up a class that will be used in a number of pgms, or projects is as follows:
- The CLASS definition is defined in a separate file; for example: General_Classes_and_functions.pgm
- NOTE that this file must NOT contain the $ sign or EndFile token at the end of the file.
- For shared use in a single project - The class definition file can be stored in the project\controls folder, then inserted into other PGM files using include file syntax >>filename.
- If the class definition file is stored in the same folder as the PGM file, then use >>General_Classes_and_functions.pgm to insert the file as needed.
- For shared use across multiple projects - The include file can be saved in a common shared folder, then inserted into other PGM files using include file syntax >>filename, the file name needs to be the relative or full path name.
- For example: >>d:\Users\SysCAD Common Files\General_Classes_and_functions.pgm (Also See example below)
- See Include Files for more information.
Working with Classes
ClassList
Available from Build 139.32530. The keyword ClassList can be added to define a list or collection of class instances. The significant advantage for coder is to define the list of classes once and reference the list in multiple ForEach macros later in the code.
Syntax is:ClassList NAME {ClassInstance1,…}
- The classes in the list must all be of the same class definition type.
- The list is a comma separated list of class that can be a specific named class instances, a named class array or an indexed class within a class array.
- The ClassList isn’t a real variable, it is a defined name ("synonym") that can be reused later in the code. At PGM load time, SysCAD simply sees the list of classes wherever we use the ClassList “variable” is used.
- The ClassList is then used in various macros (e.g. ForEachSub, ForEachVarSet, etc.) It can also be used with ClassGrid.
- Class instances can be used (repeated) in multiple lists.
- The ClassList can be added when declaring the class instances or they can be defined separately afterwards.
- Example of adding the ClassList when declaring the class instance:
TankClass{List(Tanks)} T1,T2,T3,T[5] - Example of adding the ClassList after class instances have already been defined:
ClassList ABC {T1,T2,T3,T4,T5}
- Example of adding the ClassList when declaring the class instance:
- See Examples - using ClassList.
ExcludeClass
To block a specific class instance from being used in macros (even if the class instance is in a list), use ExcludeClass followed by one or more ClassNames. A comma separated list of any number of class instances, including indexed class instances of a class array can be listed.
Syntax is: ExcludeClass ClassInstance1,...
For example: ExcludeClass Tank[0]
ExcludeClass is primarily used for excluding the class at index 0 within a class array as shown in above example. From Build 139.32530 it is possible to define this when declaring the class array using {ExcludeClassZero} or {ecz}. However because it is very common to use both ExcludeClass and ExcludeWatch, then use {ExcludeZero} or {ez}. For example:
const long TankCount = 11
TankClass T[TankCount]
ExcludeWatch T[0]
ExcludeClass T[0]
;From Build 139.32530 the above can be replaced by
TankClass T[TankCount]{ExcludeZero} ;using full keyword
TankClass T[TankCount]{ez}          ;using abbreviated keyword
Class Macros
When working with multiple class instances, a number of Macros are available which will perform repetitive functions on each class instance. At load time, a macro is converted into a sequence of normal code. This saves the user from writing out loops or multiple lines of code. It also makes it very easy to add and remove class instances without having to remember to adjust code using the class instances. Macros can work with a predefined ClassList or the classes list can be provided as a parameter for the macro. Class instances can be blocked from use in macros using ExcludeClass.
Macros
ForEachSub
The macro ForEachSub provides an efficient method to loop through all class instances from a list of classes and call a Sub within the class.
Syntax is: ForEachSub(classes, SubName(..))
Examples:
ForEachSub(TankClass, Exec())
ClassList MainTanks {T1,T5,FeedTank,TankLine.MidTank,TankLine.EndTank}
ForEachSub(MainTanks, UpdateResults(AmbientT))
ForEachFn
The macro ForEachFn provides an efficient method to loop through all class instances from a list of classes and call a Function within the class performing the specified operation and storing the result in the specified variable.
Syntax is:ForEachFn(ResultVariable, OperationMethod, Classes, FunctName(...))
Example: ForEachFn(Total, +, {T1,T2,T3}, CalcArea())
which is equivalent to: Total = T1.CalcArea() + T2.CalcArea() + T3.CalcArea()
ForEachVar
The macro ForEachVar provides an efficient method to loop through all class instances from a list of classes and using a variable within the class performing the specified operation and storing the result in the specified variable.
Syntax is: ForEachVar(ResultVariable, OperationMethod, Classes, ClassVariable)
Example: ForEachVar(TotalVol, +, {T1,T2,T3}, Volume)
which is equivalent to: TotalVol = T1.Volume + T2.Volume + T3.Volume
ForEachVarSet
The macro ForEachVarSet provides an efficient method to loop through all class instances from a list of classes and set the value of a numeric variable (string variables not supported) within the class to be equal to the specified value (or result of an expression).
Syntax is: ForEachVarSet(Classes, Variable, Expression)
Example: ForEachVarSet({T1,T2,T3}, Height, 17)
which is equivalent to T1.Height = 17 T2.Height = 17 T3.Height = 17
Macro Functions
A "Macro Function" can be used in expressions similar to a function, unlike a "Macro" which can only be used like a Sub.
ForEachFnCalc
The function macro ForEachFn provides an efficient method to loop through all class instances from a list of classes and call a Function within the class performing the specified operation and return the result.
Syntax is: ForEachFnCalc(OperationMethod, Classes, FunctName(...))
Example: Total = ForEachFnCalc(+, {T1,T2,T3}, CalcArea())
ForEachVarCalc
The function macro ForEachVar provides an efficient method to loop through all class instances from a list of classes and using a variable within the class performing the specified operation and return the result.
Syntax is: ForEachVarCalc(OperationMethod, Classes, ClassVariable)
Example: TotalVol = ForEachVarCalc(+, {T1,T2,T3}, Volume)
ForEach
This function macro is the same as ForEachFnCalc or ForEachVarCalc where at load time it auto detects last parameter type and is then equivalent to ForEachFnCalc or ForEachVarCalc.
Syntax is: ForEach(OperationMethod, Classes, FunctName(...)/ClassVariable).
ClassCount
The function macro ClassCount returns the number of class instances in the list of classes.
Syntax is: ClassCount(Classes).
Example: Count = ClassCount({TankClass})
Example: AveArea = ForEach(+, {T1,T2,T3}, CalcArea()) / ClassCount({T1,T2,T3})
Macro Parameters
Classes Parameter
All of the class macros include a Classes parameter which is used to define the list of class instances that need to be looped through. There are a number of different ways of defining the list of class instances to be used. If the list of classes includes any class instances marked as excluded using ExcludeClass, this are ignored and excluded from the list of class instances used in the macros.
The different methods for defining Classes to be used in macros are:
| Classes | Description | Example |
|---|---|---|
| ClassType | A named Class Type Definition. List used will be all class instances from global scope, up to this point in the code, of the specified class definition. |
ForEachSub(TankClass, Exec())
|
| ClassList | A previously defined ClassList name. List used will be from the defined ClassList used. |
ForEachSub(TanksList, Exec())
|
| {ClassInstance1,…} | A comma separated list of class instances, that may include indexed classes in class array. List used will be as specified in the {} list. |
ForEachSub({T1,T2,T3}, Exec())
|
| {ClassType1,…} | A comma separated list of class type definitions. List used will be all class instances from global scope, up to this point in the code, of all the specified class definitions. |
ForEachSub({TankClass,CSTR_Class}, Exec())
|
| ClassArray | A class array. List used will be all the classes in the Class Array. |
ForEachSub(T, Exec())
|
OperationMethod Parameter
Many of the class macros include a OperationMethod parameter which is used to define the operator method to be applied to the results of the functions or values of the variables for each class instance in the list of class instances that need to be looped through. The Operators allowed are: + - * or and bor band bxor.
For example to sum all the values of a class variable use the "+" operator. Sum = ForEach(+, TankClass, flow).
For example to test a bit flag in all classes use the "or" operator. AnyTanksFull = ForEach(or, TankClass, IsFull()).
ForEachClass Function
The macro function ForEachClass is the original Macro implemented and only option available before Build 139.32530. The equivalent functionality is available as ForEachSub. Original documentation: ForEachClass provides an efficient method to loop through all instances of a class and call a Sub within the class.
ForEachClass can be used in a number of ways:
| Function Syntax | Description and Example |
|---|---|
ForEachClass(ClassName,SubroutineName())
|
For Example:ForEachClass(TankClass, Exec())
|
ForEachClass({ClassNameList},SubroutineName())
|
For Example:ForEachClass({TankClass,ThickenerClass,WasherClass}, Exec())
|
ForEachClass({ClassInstanceList},SubroutineName())
|
For Example:
|
ForEachClass(ClassArray,SubroutineName())
|
For Example:ForEachClass(Tanks, Init())
|
The Sub can have any number of parameters, however string parameters are not supported. Where multiple class names (class types) are used, they must all have the same sub with the same parameters. Available for Build 139.31388 and later. Some examples:
ForEachClass({T1,T5}, SetCalcOptions(true))
ForEachClass({T2,T3,T4}, SetCalcOptions(false))
ForEachClass(TankClass, UpdateResults(EnvironmentTemperature))
NOTES:
- The Class instances or Array must be in the global scope and declared before ForEachClass is called.
- ForEachClass is not a true function, it is a convenient Macro that generates a sequence of code at PGM load time. This is why the location of ForEachClass is important relative to declaration of class instances (because it only uses the classes already declared when encountering ForEachClass during load).
- Use ExcludeClass to block classes from being used with the ForEachClass macro function. For example for an Array of classes use "ExcludeClass Tanks[0]" alongside "ExcludeWatch Tank[0]" to skip the first class instance in the array with any use of ForEachClass. Available from Build 139.31388.
- A class instance within a class is excluded.
Examples of using classes in the project
Example using Include File
The user wants to calculate the required agitator power in a number of vessels in a project. This functionality will be used in a number of different projects, and hence the file with the class will be stored on the network where it can be accessed by a number of users and projects.
A formula that may be used to calculate the agitator power for turbulent flow is:
- [math]\displaystyle{ \mathbf{\mathit{P = P_o\;N^3\;D^5\;Density}} }[/math]
- where:
- P - Agitation Power;
- Po - the dimensionless power number, which is a function of impeller geometry;
- N - agitator rotational speed;
- D - Diameter of the impeller;
- Density - Density of the material in the vessel.
The class is saved in a file called AgitatorPower.pgm and is saved on the network at n:\Users\SysCAD Common Files\
| The Class file is as follows: | The main pgm file may have the following structure: |
Class    Class_AgitatorPower
  Textbreak
  ClassGridColumnWidth 12
  ClassGridMaxColumns 5
  TextLabel "Inputs"
  String   UnitName{Tag}*
  real     Po*<<1>>
  real     N<<0.3>>{i, comment("Rotation per second")}
  real     D<<1>>{i, ("L", "m"), comment("ImpellerDiameter")}
  TextLabel "Results"
  string   DensityTag@@{ Tag}
  real     Density@("Rho", "kg/m^3")
  real     Power@("Pwr", "kW")

  Sub Init()
	UnitName = ClassTag()
    DensityTag = Concatenate(UnitName, ".QProd.SLRho (kg/m^3)")
  EndSub

  Sub Exec()
    Density = [DensityTag]
    Power = Po * N^3 * D^5 * Density
  EndSub
EndClass
|
PageLabel "Agitators"
>>n:\Users\SysCAD Common Files\AgitatorPower.pgm
Textbreak
;Define class instances in grid format by adding "#"
Class_AgitatorPower # Cementation, NiCo_Precip, Ni_Diss_1

Sub InitialiseSolution()
  ForEachClass(Class_AgitatorPower, Init())
EndSub

ForEachClass(Class_AgitatorPower, Exec())
$ ; --- end of file ---
|
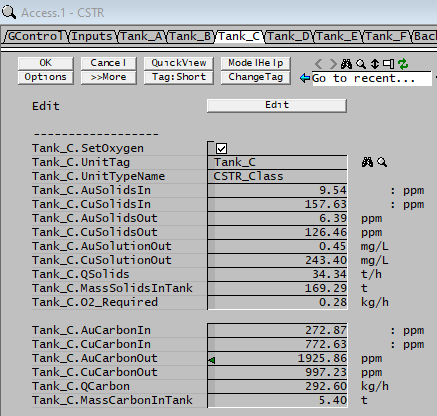
And the access window of the controller will show the following fields:
Notes:
- The user may follow the same rules for individual functions that may be useful in a number of pgms or in separate projects.
Declaring Class Instances
; Declare Class instances
	CSTR_Class Tank_A, Tank_B, Tank_C, Tank_D, Tank_E, Tank_F
;-----------------------------------------------------------
;Initialise class instance
	Sub InitialiseSolution()
		ForEachClass(CSTR_Class, Init())
	EndSub
;-----------------------------------------------------------
;Execute CSTR_Class subroutines
	ForEachClass(CSTR_Class, Exec())
NOTES:
|
Declaring Class Instances in an array
Class instance can also be defined in an array format, for example an equivalent of the above code can be written as:
| After Build 139.31388 / 139.32530 | For earlier builds of SysCAD |
|---|---|
;After Build 139.32530
const long TankCount = 7
CSTR_Class Tank[TankCount]{ez}

Sub InitialiseSolution()
    ForEachSub(Tank, Init())
EndSub

ForEachSub(Tank, Exec())
;After Build 139.31388
const long TankCount = 7
CSTR_Class Tank[TankCount]
ExcludeWatch Tank[0]
ExcludeClass Tank[0]

Sub InitialiseSolution()
    ForEachClass(Tank, Init())
EndSub

ForEachClass(Tank, Exec())
|
long i
const long TankCount = 7
CSTR_Class Tank[TankCount]
ExcludeWatch Tank[0]

Sub InitialiseSolution()
     i = 1
     While (i<TankCount)
         Tank[i].Init()
         i = i + 1
     EndWhile
EndSub

i = 1
While (i<TankCount)
     Tank[i].Exec()
     i = i + 1
EndWhile
|
NOTES:
- Seven CSTR_Class instances are defined here, Tank 0 to Tank 6.
- The array always starts with 0, therefore, we have intentionally defined 7 instances here and we will use Tanks 1 to 6. In our PGM code we will skip Tank 0 and start with Tank 1.
- The
ExcludeWatchKeyword instructs SysCAD not to display Tank 0. - The
ExcludeClassKeyword instructs SysCAD not to include Tank 0 in any ForEach macro. - If the "Init()" subroutine requires a different input parameter for each call, such as Init("tagname"), then
ForEachSub(Tank, Init())cannot be used.
Using ForEachClass with multiple class declarations
Some Examples on how to use the function:
| The following code... | Is equivalent to... |
|---|---|
CSTR_Class Tank10, Tank20
CSTR_Class Tank[3]

 ;Example 1:
 ;Call Exec for all instances of CSTR_Class
 ForEachClass(CSTR_Class, Exec())

 ;Example 2:
 ;Call Exec for all instances in Tank[] Class Array only
 ForEachClass(Tank, Exec())

 CSTR_Class  Tank30
|
CSTR_Class Tank10, Tank20
CSTR_Class Tank[3]

 ;Example 1:
 ;Call Exec for all instances of CSTR_Class
 Tank10.Exec()
 Tank20.Exec()
 long i
 i = 0
 While (i<3)
     Tank[i].Exec()
     i = i + 1
 EndWhile

 ;Example 2:
 ;Call Exec for all instances in Tank[] Class Array
 i = 0
 While (i<3)
     Tank[i].Exec()
     i = i + 1
 EndWhile

CSTR_Class Tank30
|
Examples Using ClassList
- Example of define Class instances and Class List Separately:
;define Class instances
TankClass T1,T2,T3,T4,T5
;define the class list
ClassList ABC {T1,T2,T3,T4,T5}
- Example of defining the ClassList at the same time as the class instances declaration, can use List/L/ClassList
TankClass{List(ABC)}T1,T2,T3
- Examples of using the ClassList created:
ClassGrid ABC
ForEachSub(ABC, Init())
TotalMass = ForEach(+, ABC, Mass)
- Other Examples:
ClassList List1 {T1,T2,T3}
ClassList List2 {T4,T5}
ForEachClass(List1, Exec(true))
ForEachClass(List2, Exec(false))
Example User Defined Classes
- Gold Project - demonstrates the use of Classes in the CSTR pgm file. This is used to calculate the gold and copper leaching and adsorption values in a number of individual tanks.
- Lime Preparation (Makeup) Example - demonstrates the use of two user defined Classes: Set Species Splits and Optimise Controller.
- Milling and Flotation Project - demonstrate the use of Classes to display flotation recoveries at the end of project solve.
- Milling and Magnetic Separation Project - demonstrate the use of Classes to display cyclone splits and magnetic separator recoveries.
- Size Distribution Project - demonstrate the use of Classes to display some cyclone split information.
- Digestion with Direct Heating - demonstrates the use of Classes to calculate user defined properties.
- Demo Ammonia Project - demonstrates the use of Classes to calculate water shift.
- SOP Example Project - demonstrate the use of Classes to add rainfall and evaporation to the tank model (emulating a pond).
- FerroManganese Furnace Example Project - demonstrates use of Classes to set flow in feeders, perform heat loss calculations, and to calculate and set reactions extents.
- See Example Class Files for more examples of user defined class definitions.
Predefined Classes in SysCAD
| Predefined Class | Brief Description |
| Useful class instances include: | |
| SDB - Species Database Class | The SDB class instance gives access to information about species and phases within a project. For example, users can obtain species Density, Saturated Temperature or Pressure, number of solid species in a project, etc. |
| PSD - Particle Size Definition Class | The PSD class instance gives access to information about the Particle Size Definition (PSD) within a project. For example, users can find the number of Size Intervals in a PSD, the Top and bottom Size, etc. |
| PM - Plant Model Class | The PM class instance provides a function to retrieve a list of global tags available in the Plant Model (PM), can be used in PGM or MP files. |
| Useful classes include: | |
| Array Class | This Class lets user define an array to read or store numeric values. |
| StrArray Class | This Class lets user define an array to read or store (in memory) string values. |
| Matrix Class | This Class lets user define an matrix to read or store values. |
| TagSelect Class | This Class provides a function to retrieve a list of model tags meeting a SQL type select query, similar to the Excel Tag Select Reports. |
| Time Class | This Class contains some function to manipulate the time readings. |
| Some Old but still usable classes include: | |
| Noise Class | This has been implemented into SysCAD as the Noise Process unit. |
