Declaring Variables
Navigation: PGMs ➔ PGM Programming and Conventions ➔ Declaring Variables
| PGM Syntax | Data Types | Declaring Variables | Predefined Variables | Formatting |
|---|
Introduction
- Variables must be declared as one of the permissible Data Types.
- A variable may be positioned anywhere in the PGM code, as long as it is declared before it is used.
- Any number of variables of the same data type may be declared together by separating each one with a comma, e.g. real SolidsFlow, LiquidsFlow, MetalRecovery
- When declaring variables, some optional keywords/symbols can be assigned to the variable for added functionality. Some of the common keywords are summarised in the table below, Common Options for Variable declaration. A list of all options is given at: All Options when Declaring variables.
- Users may also conceal variables based on a based on a test. Please see Conceal Variables.
Available Options when Declaring Variables
When declaring variables described in the table below:
- The options can be chosen by specifying either the Short cut or short name enclosed in { } after the variable is declared.
- Multiple options are chosen by separating them with commas within the same set of { }.
Summary Table of Common Options for Variable declaration
| Keyword/Special Symbol | Description | Example |
|---|---|---|
| , | Comma - Used to separate variables defined in the same line. | Bit Init, Start, Stop
|
| * | Appending * allows the variable to be viewed and set in the access window (white box). | Checkbox Init*
|
| @ | Appending @ allows the variable to be viewed only in the access window (grey box). | Real Recovery@
|
| ("Family", "Units") | Adds Engineering Units for the variable. Do be aware that conversion units ARE case sensitive. Specified Units are for variable value in code, and are not units for display in Access window. See heading Declaring variables with conversion information and Copy conversion unit syntax for variables |
|
| <min, max> | Assign valid Range to an input variable. See Declaring variables with ranges |
|
| {Comment("xxxxx")} {"xxxxx"} |
Adds a short Comment to the variable See Advanced Options when Declaring variables The Comment keyword is optional from Build 139.32530 |
|
Examples
Summary Table of All Available Options when Declaring Variables
| Option Name | Abbr. | Short cut | Description |
|---|---|---|---|
| input | i | * | Makes the variable an input (writeable) field. This is equivalent to Declaring variables as input or read/write (*). |
| result | r | @ | Makes the variable a result (read only) field. This is equivalent to declaring variables as read only (@). |
| concealed | c | ** or @@ | Conceals the variable from the access window. The variable can only be seen in the access window if the ShowConcealed button is pressed. Otherwise it still acts as a input or result field, i.e. it can be written to if it is an input field and it can be referenced externally. If this variable is not defined as a input or result, then it is assumed to be an input field. See Declaring concealed variables for more information. |
| cnv | n/a | () | The conversion units for the variable can be defined. The format is Cnv(Conversion Family, Engineering Units). The same format as described above can also be used i.e. (Conversion Family, Engineering Units). See Declaring variables with conversion information for more information. |
| range | n/a | <> | A range, minimum or maximum can be set for the variable. The format is Range(minimum, maximum). The same format as described above can also be used i.e. <minimum, maximum>. To specify minimum only <minimum,>. From Build139.32530, minimum or maximum can be a pre-defined constant. See Declaring variables with ranges for more information. |
| nan | n | n/a | Allows the user to enter NAN (Not A Number), shown as a "*" on the SysCAD Access window. Can only be used for DOUBLE or REAL. If this variable is not defined as a input or result, then it is assumed to be an input field. |
| hidden | h | n/a | Makes the variable normally hidden in the access window. Otherwise it still acts as a input or result field, i.e. it can be written to if it is an input field and it can be referenced externally. This field can be seen by pressing the More button. If this variable is not defined as a input or result, then it is assumed to be an input field. Note: If a variable was originally declared as hidden but the user no longer wishes it to be hidden, then the user needs to choose the Reset formatting, conversions and visibility option for SysCAD to clear this as a hidden field (as well as amending the variable declaration in the PGM file). |
| stopped | s | n/a | The variable can only be set when the SysCAD model is stopped. If this variable is not defined as a input or result, then it is assumed to be an input field. |
| tag | t | n/a | Adds the Find Unit and Find and Access buttons next to the variable in the access window. If the string is (or contains) a valid SysCAD tag then these buttons can be used to find the unit and its access window. Can only be used for Data Types STR, STRING or MEMO. If this variable is not defined as a input or result, then it is assumed to be an input field. |
| comment | n/a | n/a | A short comment description string for the variable that is displayed to right of tag in the access window. The format is Comment(string) or from Build139.32530 "string" where the word comment can be excluded and simply provide the string in quotes.
From Build139.32530 the value can be a pre-defined string constant. For Example: |
| excludesave | es or e | n/a | The variable (or class) state is not saved with the project. |
| excludegrid | eg | n/a | Available from Build 139.35544. Used to exclude variable in PGM Class from being displayed in ClassGrid. The variable is displayed before the grid in list format. |
| init(value) | n/a | <<value>> | Assign an initial value to an input variable. From Build139.32530 the value can be a pre-defined constant. For Example: |
| help | n/a | n/a | A description string for the variable that is displayed as a help string at the top of the access window when the field is selected. The format is Help(string). |
Note: The order the options are specified is not important. For example, a{i,c} is the same as a{c,i}.
Examples
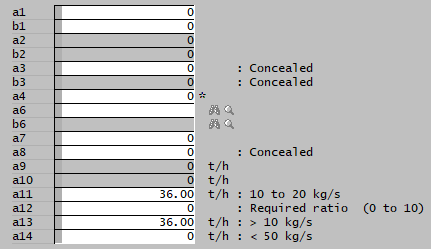
Real     a1{input}, b1{i}       ; a1 and b1 are input fields - equivalent to Real a1*, b1*
INTEGER  a2{result}, b2{r}      ; a2 and b2 are result fields - equivalent to INTEGER a2@, b2@
Real     a3{c}, b3{r,c}         ; a3 is a concealed input field, b3 is a concealed result field. Equivalent to Real a3**, b3@@.
Real     a4{n}                  ; a4 is an input field that allows NAN(*) to be entered. Equivalent to Real a4{i,n}
INTEGER  a5{h}, b5{r,h}         ; a5 is a hidden input field, b5 is a hidden result field.
STRING   a6{t}, b6{r,t}         ; a6 is an input field, b6 is a result field, both will have additional buttons next to them.
Real     a7{s}                  ; a7 is an input field which can only be set while the model is stopped.
INTEGER  a8{i,c,s}              ; a8 is a concealed input field which can only be set while the model is stopped.
Real     a9{r, ("Qm", "kg/s")}         ; a9 is a result field with mass flow units.
Real     a10{r, Cnv("Qm", "kg/s")}     ; a10 is a result field with mass flow units.
Real     a11{*,("Qm","kg/s"),<10, 20>} ; a11 is a mass flow input field with a range of 10-20 kg/s.
REAL     a12{i,Range(0,10),Comment("Required ratio")}   ; a12 is an input field with range 0 to 10 and "Required Ratio" next to the field.
Real     a13{*,("Qm","kg/s"),<10,>}    ; a13 is a mass flow input field with a MINIMUM value of 10 kg/s.
Real     a14{*,("Qm","kg/s"),<,50>}    ; a14 is a mass flow input field with a MAXIMUM value of 50 kg/s.
The Access window will look as follows:

Variable Declaration Rules
Some variable naming rules need to be observed when defining variables (or function or class names):
- Variable names are not case-sensitive.
- A Variable may not contain any "whitespace". So no spaces, tabs or control characters. Use _ (underscore) instead.
- A Variable may not contain a . (dot).
- It is recommended that variable name is alphanumeric. Use combination of A-Z, a-z, 0-9 and '_'.
- A Variable may not start with a numeric character. For example: "10_Tank_001" is not allowed.
- Some special characters are currently allowed, but it is recommended to not use these as support may be discontinued in future and/or they can cause problems in code editors.
- The variable length should not be too long. The maximum length allowed is 50 characters.
- A Variable may not be the same as a PGM syntax keyword.
- Must be unique within a PGM file.
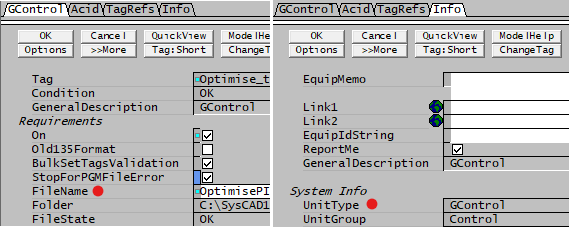
- Must be unique within the GC controller. For example, variable names (in global scope) such as "Filename" or "UnitType" are not allowed, as these are actual tags used by the General Controller. Please check the GControl access window for any potential "reserved" variable names.
Declaring variables for internal use within a PGM
A variable is simply declared and is used within the pgm code. If no options are used, then it is not visible in the controller's access window and hence it is inaccessible outside of the PGM.
Examples
real    Subtotal, Solidsflow, ReqdLiquid
integer i, count, NumberOfTanks
Declaring variables as read only (@)
Appending a @ to the end of the variable name is the shortcut to make the variable visible as a read only tag. It appears in the access window as a result with a grey background. The user will not be able to change its value externally.
Notes:
- Appending @@ to the end of the variable name makes it a read only concealed variable (refer to Available Options when Declaring Variables for more information).
- Read only variables can also be declared as one of the options in { } using r or result (refer to Available Options when Declaring Variables for more information).
Declaring variables as input or read/write (*)
Appending a * to the end of the variable name is the shortcut to make the variable visible as a writable tag. It appears in the access window as an input with a white background. The user will be able to change its value.
Notes:
- Appending ** to the end of the variable name makes it a writeable concealed variable (refer to Available Options when Declaring Variables for more information).
- Writeable variables can also be declared as one of the options in { } using i or input (refer to Available Options when Declaring Variables for more information).
- The user may also display the variable in the Access window as a read/write variable by using the Watch functionality.
Examples
INTEGER    x
STRING     y@
INTEGER    z*
REAL       StreamFlow, Ratio*, RqdFlow@
|
- Variables x and StreamFlow are internal. (not visible on access window or accessible as tags)
- Variables y and RqdFlow are read only. (Visible result fields accessible as tags)
- Variables z and Ratio are writeable. (Visible input fields accessible as tags)
Declaring variables with conversion information
When specifying (Conversion Family, Engineering Units), a valid predefined SysCAD conversion family and unit must be specified in the brackets separated by a comma.
- The conversion family specifies the group of conversions the tag belongs to. It also allows setting/getting the tag value correctly from Trends, Excel, etc. using any of the units belonging to the conversion family. With the defined conversion family know, the units of display in the Access window will be the default for that family. The user can select any other possible units for display in Access window for a specific tag.
- The engineering units are defining the units for the numerical value of the variable used in the code. NOTE: These are NOT the units for display in user interface (Access Window).
- The conversion family and conversion units ARE case sensitive.
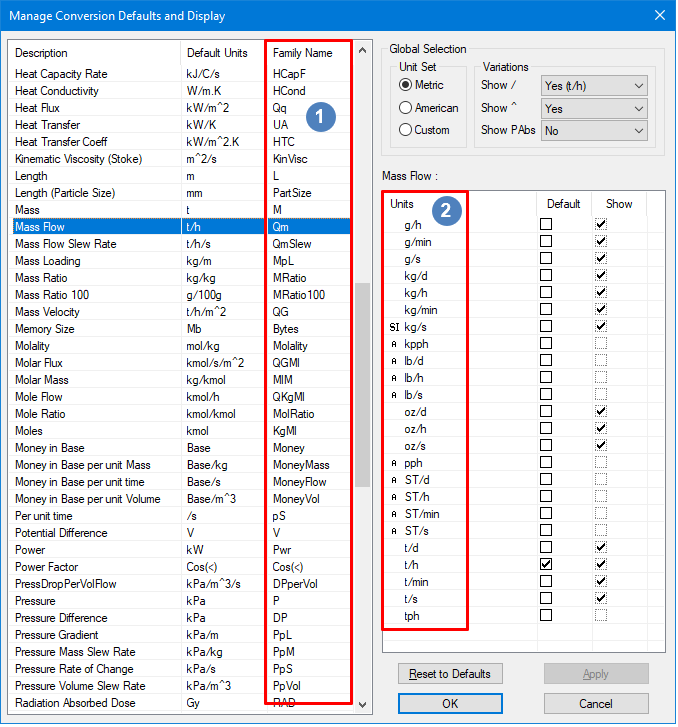
- To view the available list of Engineering Units while in SysCAD, go to menu Edit|Conversions|Defaults and Displays, this will display the following Window:

|
For Example: To define a variable for Mass Flow, we have: Real FeedMassFlow@("Qm", "t/h")
NOTES:
|
The list shows the default units and conversion family for each conversion group. The available engineering units for the selected group are shown on the right hand panel. To add/modify the engineering units (excluding SI units), please refer to Conversions Table for instructions.
Some common conversion families are shown below:
| Conversion Type | SysCAD Conversion Family | Some Common Units | Example |
|---|---|---|---|
| Concentration | Conc | g/L, mg/L, kg/m^3 | ("Conc","g/L") |
| Density | Rho | kg/m^3, t/m^3, g/L | ("Rho","kg/m^3") |
| Energy | E | J, kJ, cal | ("E","kJ") |
| Fraction | Frac | %, ppm | ("Frac","%") |
| Mass Flow | Qm | t/h, kg/h, t/d, kh/min | ("Qm","t/h") |
| Power | Pwr | kW, kJ/s, MJ/h | ("Pwr","kW") |
| Pressure | P | bar, atm, kPa, kPag, psi | ("P","bar") |
| Temperature | T | C, K, F | ("T","C") |
| Time | Time | s, min, h, d, week, year | ("Time","h") |
| Volumetric Flow | Qv | m^3/h, L/h, L/min | ("Qv","m^3/h") |
Alternatively, see Conversion List Table for a list of available conversion families.
Declaring variables with ranges
If the Data Type is DOUBLE, REAL, INTEGER, LONG or BYTE, the expected range of the variable may be declared using angled brackets: <minimum, maximum>. The user may specify either a minimum or a maximum or both.
From Build139.32530 predefined constants can be used for the minimum and/or maximum values.
If the variable is an input (writeable) field, then this range is immediately applied, preventing values outside the defined range from being used.
If the variable is a result (read only) field, then this range does NOT prevent the variable from going outside of the defined range.
Examples:
;The input variable RequiredFlow will be restricted to values BETWEEN 1 and 10 kg/h.
Real  RequiredFlow*("Qm", "kg/h")<1, 10>

;The input variable RequiredFlow will be restricted to values ABOVE 1 kg/h.  There is no user defined maximum restriction.
Real  RequiredFlow*("Qm", "kg/h")<1,>

;The input variable RequiredFlow will be restricted to values BELOW 10 kg/h.  There is no user defined minimum restriction.
Real  RequiredFlow*("Qm", "kg/h")<,10>

;From Build139.32530 a predefined constant can be used:
const real MinEnvTemp = 5
const real MaxEnvTemp = 45
real FeedT@("T","C")<MinEnvTemp,MaxEnvTemp>
real WaterT@("T","C")<MinEnvTemp,MaxEnvTemp>
Declaring variables with an Initial Value
If the Data Type is DOUBLE, REAL, INTEGER, LONG, BYTE or STRING an initial value may be assigned to the variable using double angled brackets: <<value>> or {init(value)}. The initial value is assigned at the time the variable is first created during the pgm load, so this is a ONCE-OFF initialisation value. The main use of initial values is for user input variables.
Examples:
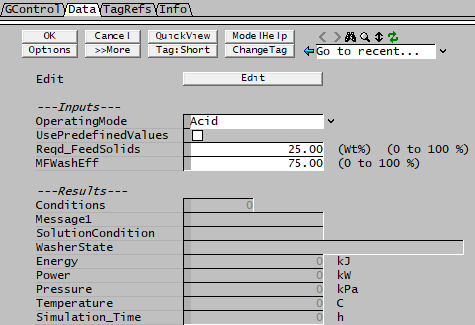
REAL   Ratio{i,Range(1,10),init(5),Comment("Required ratio")} ;The valid range is 1 to 10, with the initial value set to 5.
REAL   FeedT*("T", "C")<<30>>                                 ;The initial feed temperature is set to 30 dC - if the initial value was not defined, the initial feed temperature would have been 0 dC)
REAL   TargetT*("T", "C")<<80>><40,120>                       ;The initial target temperature is 80 dC, the valid temperature range is 40 to 120 dC
STRING WasherState@<<"Unknown">>                              ;The initial washer status is "unknown"
This will be displayed in the Access window when the pgm is first loaded:
NOTES:
- The initial value is only set once when the pgm is first loaded and will not be used again - it is NOT set at every initialisation step.
- If the user changes the variable value, then the controller will always use the user specified value, it will not revert to the Initial value specified in the code.
- If the user changes the Initial value in the code it will not be used when reloading the code (the controller is remembering the state of all variables).
- If the user does NOT use the Initial value function when declaring a new variable, the initial value is:
- 0, if no valid range has been assigned; OR
- The minimum value if a value range has been defined. See Declaring variables with ranges.
Declaring Concealed Variables
Any variable may be concealed, or hidden, from the access window. The variable can only be seen in the access window if the Show Concealed button is pressed. It still acts as a input or result field, so it can be written to if it is an input field and it can be referenced externally. If this variable is not defined as a input or result, then it is assumed to be an input field.
real    FlowInput**("Qm", "t/h")
integer WashersOnline@@
real    EquationConst{c, Comment("Set by PID")}
These variables will not normally be visible in the Access window, but there will be a comment next to the 'Show Concealed' button:
If the user clicks on the Show Concealed button, the variables will be displayed in the Access window as follows:
Notes:
- The user may also conceal or show a variable using the SetConcealedState functionality. This allows the user to show or hide a variable depending on a bit value that may be True or False. See the example below:
bit   UseVolumeFlow*
real  MassFlowInput*("Qm", "t/h")
SetConcealedState(MassFlowInput, UseVolumeFlow)
; If the user sets 'UseVolumeFlow' = 1, or True, then 'MassFlowInput' will be hidden,
; otherwise if 'UseVolumeFlow' = 0, or False, then 'MassFlowInput' will be visible in the Access window.
Declaring a Class and access to class members
Please see Classes: declarations and access to members for more information.


