Model Data Transfer
Navigation: User Guide ➔ Windows ➔ Access Window ➔ Data Transfer
| SysCAD Tags | Copy and Paste Tags | Change Tag | Data Transfer |
|---|
This page is for Build 139. For Build 138 and earlier please see Model Data Transfer 138.
Introduction
This section details how model configuration parameters can be transferred from one unit to another. This is really useful when configuring a number of units with the same set-up, e.g. thickeners in a CCD circuit, precipitators, etc.
Unit model configuration data can be transferred in the following ways:
- Transferred between unit models of the same type within the same project.
- Saved to a block - text file.
- Transferred from a pre-saved block to unit models.
The Data Transfer command can be accessed in a number of ways:
- Via the Right click on Access Window variables, when the selected variable is a writeable field.
- Via the Options button on the Access Window of any unit
- From the pop-up menu on the graphics window.
In the next section, we will use the first option listed above as an example.
Data Transfer variable selection
User can select the variables to be transferred before entering the Data Transfer dialogue:
To Select Variables Beforehand:
- On the Access Window, select one or more variable to be transferred
 , if user has made a change to the select variable (value will be in blue font), then please press the OK button first to apply the change (value will be in black font) before selecting data transfer.
 - Right click on the variable (must be writeable) to bring up the pop up menu, select Data Transfer from the bottom of the list
 .
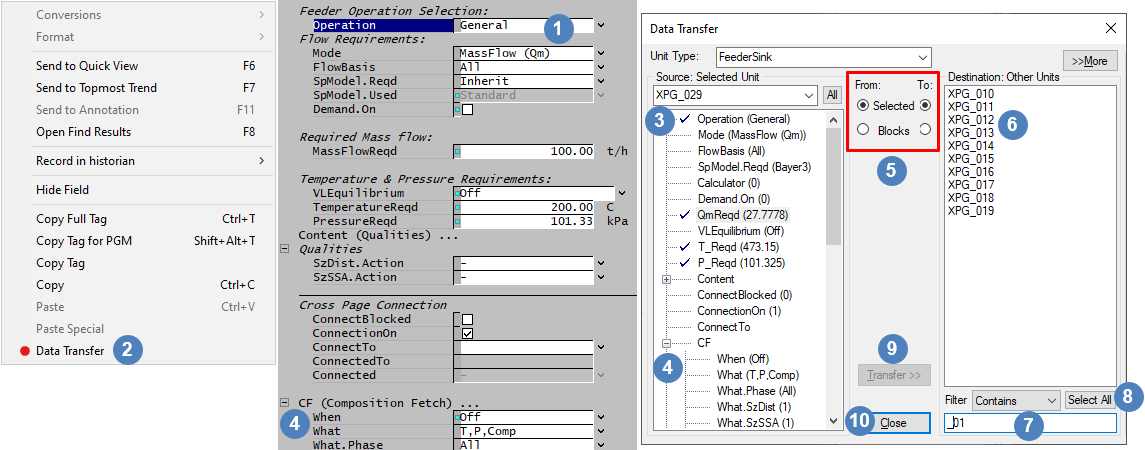
. - The Data Transfer Dialog box will open, with the selected variables Marked for transfer
 (shown by tick marks)
- If the Data Transfer dialogue box was started from the "Access Window - Options button" or "Graphics Window right click", then user will need to select the variable(s) from the list manually.
- In the above example, we have selected more fields (QmReqd, T_Reqd and P_Reqd) by clicking the the required variables.
- The variables should be in the same order as they appear on the access window, if the variable belongs to a sub group, user will have to click on the
 to access the sub group variables.
- The data of the selected variables can be transferred to other unit operations of the same unit type in the same project, or they can be saved to a file block (inert link here) to be used later in another project.
- The Destination will be either a list of other units or a list of block files, depending on the selection above.
- The Destination list can be filtered to display only the relevant units.
- Press the Select All button to select all displayed units. If no filter is used, then this selects all units of the selected model type.
- Press the Transfer button to complete the data transfer to the selected Destination units (or blocks).
- Press Close to close the dialog box.
NOTES:
- The Unit Type List box will default to the unit type you have started the Data Transfer from. User can click on this list box to change to different model type
- The Source: Selected Unit pull down list contains all units of the chosen model type currently in the project. User can click on this list box to select a different unit model.
- Only configuration fields can be copied, i.e. white data fields. Any calculated or derived information is ignored when data is transferred.
- The More button on the top right-hand corner opens the previewing pane for the copied fields. Once this is pressed, the button changes to the Less button. Use this to close the previewing pane.
- When SysCAD is busy transferring data, the mouse cursor will change into the hourglass icon. When the mouse pointer returns to normal, the data transfer is complete. A message will appear in the Message Window informing the completion of data transfer.
Transferring Data
The Data Transfer can be completed in three ways:
- Data from a unit model can be copied to other unit models in the same project. (The data to be copied must have been confirmed first by pressing OK, values must be in black colour)
- Data from a unit model can be copied into a file block to be used by other projects later.
- Data can be copied from a saved file block to the current project.
Copy from Unit to Unit |

|
Make the selection in as per the picture. This will allow you to copy from a selected unit to another unit of the same model type within the current project. The steps for data transfer is listed in Data Transfer variable selection. |
Copy from Unit to Block |

|
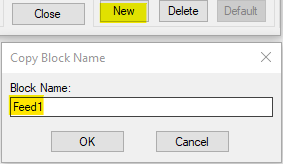
The unit data can be copied from a selected unit to a block - text file for further use. (Stored in ../SysCADxxxx/project group/cfgfiles/Options.CopyBlockData.ini)
The steps for data transfer is listed in Data Transfer variable selection, this will be for step
|
Copy from Block to Unit |

|
Unit data can be copied from a data block to a selected unit. (Data saved in ../SysCADxxxx/project group/cfgfiles/Options.CopyBlockData.ini).
Open the Data Transfer Dialog, make sure the Unit Type is selected is correct (i.e. contains the copied data transfer data).
|


