Reaction Editor
Navigation: User Guide ➔ Editors and Utilities ➔ Reaction Editor
| Overview | Reaction Block Data Section | RB Sub Model (Model Theory) | ||||||
|---|---|---|---|---|---|---|---|---|
| Reaction Editor | Reaction Block Summary | Reaction Block Tabs (Main) | Individual Reactions | Reaction Extents | Source / Sink / Heat Exchange | Solving Order - Sequential or Simultaneous | Energy Balance | Heat of Reaction / Heat of Dilution / Partial Pressures |
Related Links: Reaction File (RCT) Text Format
Introduction
With all the features it provides, the SysCAD Reaction Editor makes it easier to create and edit reaction files. Therefore, we highly recommend our SysCAD users install it.
It is available with the latest install version of SysCAD, or from the Download section of our website (https://www.syscad.net/login/).
Video Links
These short video clips are available in the Tutorial Section of the Help documentation, or directly in YouTube.
- Add a Reaction using the SysCAD Reaction Editor - shows you how to add Reactions using the Reaction Editor.
- Adding a Source to the Reaction Editor - demonstrates how you can add a Source to the Reaction Editor.
- Adding a Sink to the Reaction Editor - demonstrates how you can add a Sink to the Reaction Editor.
- Adding Heat Exchange to the Reaction Editor - shows you how you can add Heat Exchange to the Reaction Editor. It briefly describes the different methods that are available.
- Using a Species Group in the Reaction Editor - shows how to set up and use a Species Group in the Reaction Editor.
Set up the Reaction Editor
Installing the SysCAD Reaction Editor
- When SysCAD is installed there is an option to install the Reaction Editor. If this option was selected then there is nothing more to do.
- If Reaction Editor wasn't installed as part of the SysCAD install then the user needs to obtain a copy of the Reaction Editor installation file. They can obtain this:
- From the folder \SysCADXXX\Setup\ReactionEditor
- By downloading it from the SysCAD Downloads Page (https://www.syscad.net/login/), in the Utilities section. Once you have downloaded the zip file, you can unzip the installer for the Reaction Editor.
- Once the Reaction Editor installer file (.msi) has been obtained, run the installer and follow the steps outlined in the dialog boxes. If the default settings are used, the Reaction Editor will be installed in the folder C:\Program Files\SysCAD.
- The Reaction Editor uses the .NET framework (version 4.8).
- If you do not have this installed on your computer you will be prompted to download it from Microsoft. You can search for this or use this link https://dotnet.microsoft.com/en-us/download/dotnet-framework
Setting Reaction Editor as Default editor

|
In SysCAD, select menu command Tools > General Options - General Tab page, under Editors (Reactions option)
Once this is done, the next time you press the Edit Rct File button in SysCAD (see Opening Existing Reaction Files), the SysCAD Reaction Editor will start up. Notes:
|
Location of Reaction Files

|
When a new project is created, a sub-folder called Reactions is automatically added, any reactions created within the project will be automatically added to this folder. The picture shown here is for the Demo Nickel Copper Project.
This folder contains the file 'SpeciesData.ini', which contains all of the information about the species used within the project. The SysCAD Reaction Editor uses the information in this file to display the available species, determine if reactions are balanced, autobalance reactions if required, etc. The SysCAD Reaction Editor will automatically save any new reaction files into this folder. For quick access to this folder from within the Reaction Editor, you can select File > Open Containing Folder or right-click a specific reaction file and select Open Containing Folder Note:
|
Running Reaction Editor
If you followed the previous steps, then next time you have a project open, on any RB tab page, press the Edit Rct File button (See Opening Existing Reaction Files) and the SysCAD Reaction Editor will start up.
- It will show all reaction files in the current project. The reaction file shown in the window will correspond to the one specified on the RB tab page chosen.
Alternatively, you can simply run the Reaction Editor without SysCAD. You can do this by either selecting SysCAD Reaction Editor from the list of programs in the Start menu, or going to the installed folder (usually C:\Program Files\SysCAD or C:\Program Files (x86)\SysCAD) and running the SysCADReactionEditor.exe file. When opening the Reaction Editor this way, no reaction files will be loaded.
- To load a reaction file, use the File > Open command to browse for the desired reaction file (saved in the Reactions subfolder of a project).
- To load all the reaction files for a project, use the File > Open Folder command to browse for the Reactions subfolder of the desired project.
Reaction Editor Options

|
On the main Reaction Editor Edit menu, there is an Options field.
This field has two options which can be enabled or disabled:
|
Reaction Files
Creating a New Reaction File
A reaction file can be automatically created when you press the Edit Rct File button.

- The RCT_Name field can be left empty, in this case, the reaction file name created will be "UnitName".rct, so for the example used in the picture above, it will be Ni_Diss_2.rct.
- The RCT_Name can also be typed in prior to pressing the Edit Rct File button. If the file does not exist, it will be created for you.
- The first time a reaction file is created in a project, the Reaction Editor will start with a blank reaction.
- Please see Defining a New Reaction for information on how to add the reactants and products.
Opening Existing Reaction Files
Once SysCAD has been set to use Reaction Editor (see Setting Reaction Editor as Default editor), reaction files can be opened from SysCAD by pressing the Edit Rct File button.

The SysCAD Reaction Editor will start up and shows all reaction files in the current project with the selected one being in the current window. See example below:

| Number | Description | ||
|---|---|---|---|
| The existing reactions are displayed in the reaction Window. | |||
| The reaction editing panel will show details of the selected reaction, such as reactants, products, reaction extent, heat of reaction override and so on. Use this to edit the reaction. | |||
| The species used in the currently selected reaction are in bold and in blue in the species list in the right hand side window. The species used in other reactions in the current reaction file are in bold and in black in the species list in the right hand side window. | |||
| The filter can be used to shorten the display of the species list. For example, type in (aq) will show only the aqueous species, or type in Ni will display species containing Ni only. | |||
| The Title bar shows the current reaction file name. | |||
All the reaction files in the current project are listed here.
| |||
| This shows the species database location. See note in Location of Reaction Files | |||
| The log window will display any messages/warnings/errors found by the Reaction Editor. To clear the log go to View > Clear Log. |

Saving and Closing Reaction Files

|
If a file has been changed it will be blue in the left hand side window and have an '*' next to the file name on the top of the reaction window. If there are any unsaved changes to the file, the user will be asked if they wish to save the file prior to it being closed. Reaction files can be individually closed either by using the menu command File > Close or clicking on the X in the top right corner of the reaction window. |
Editing the Reactions
Adding a New Reaction
The first time a reaction file is created in a project, the Reaction Editor will start with a blank reaction.
If additional reactions are required, press the Add Reaction button in the Reaction Display Window ![]() .
.
Defining a New Reaction
For example, let's add the following reaction, note it is in an unbalanced state:
- [math]\ce{ FeSO4(aq) + O2(g) + H2SO4(aq) \; = \; Fe2[SO4]3(aq) + H2O(l) }[/math]
The image below shows a new reaction being added:

| Number | Description |
|---|---|
| This table continues from the previous table in Opening Existing Reaction Files, refers to the numbers listed in that table. | |
| Reactant box - drag the species from the species list | |
| Product box - drag the species from the species list | |
| Reaction Extents - Specify the reaction extent type, values, and the extent species. Please see Reaction Extents for more detail. NOTE: If a % is shown next to Value field, enter as percentage, otherwise, Value is a fraction. | |
| Heat of Reaction - SysCAD normally uses the Heats of Formation of the products and reactants to calculate the Heat of Reaction. However, if a Heat of Formation value is missing in the species database for any compounds involved in the reaction, then user will need to tick the Override tick box and specify a user defined Heat of Reaction. | |
| Once a reaction has been entered, its status will be shown just above the log window on the status line. | |
Note: Users should FIRST drag species into the Reactant and Product boxes and THEN adjust the number of moles of each species reacting, or use the automatic balance functionality.
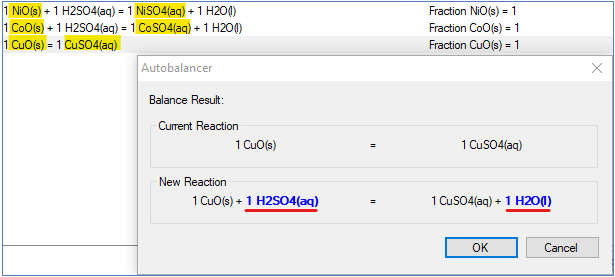
Balancing the Reaction
Normally two things will happen when the ![]() button is pressed, user will either be shown the balanced reaction or be asked to specify extra species. We will explain these using two examples:
button is pressed, user will either be shown the balanced reaction or be asked to specify extra species. We will explain these using two examples:
Example 1 Sufficient Species
For example, in the above topic, we have added the Ferrous to Ferric reaction,
- [math]\ce{ FeSO4(aq) + O2(g) + H2SO4(aq) \; = \; Fe2[SO4]3(aq) + H2O(l) }[/math]
- This reaction is not balanced, users will find a message displayed in the Status bar: Status: Imbalanced. Excess product elements: {Fe = 1}, {S = 1}, {O = 3}.

- This reaction is not balanced, users will find a message displayed in the Status bar: Status: Imbalanced. Excess product elements: {Fe = 1}, {S = 1}, {O = 3}.
- To balance the reaction, either
- manually enter the number of moles of each species in the reaction;
- Or press the
 button for suggestion from SysCAD.
- When the button is pressed, the Reaction Editor will attempt to balance the active reaction with the specified Reactants and Products.
- The Autobalancer will display both the original and some options for a balanced reaction:
- The user may then either:
- Select one of the balanced options (Fraction, Decimal or Whole Number) and accept the changes by pressing 'OK', or
- Reject the changes by pressing 'Cancel'

Example 2 Insufficient Species
For example,
- If a user simply enters Ferrous and Ferric as reactant and product, and nothing else, then pressed the button,
- As we are missing sulfuric acid, water and oxygen, we will have the "Autobalancer Additional Species" dialog box opened:
- When this happens, the user can either:
- click on 'Cancel' to return to the Reaction Editor, add additional species to the Reactants or Products and try again; OR
- use a previously specified group of species, or set up a new group of species for balancing reactions.
- click on 'Cancel' to return to the Reaction Editor, add additional species to the Reactants or Products and try
- In the dialog box above there are no previously specified species groups that are useful for this reaction, and hence we will define a new Species Group
- Type in a name in the Species Group box
- Type in the name of the required additional species, including phase, with commas between species.
- You CANNOT drag species into this dialog box, but can select from a drop list after the first letter is entered as shown below:
- After all the additional species are entered, you can press OK and the reaction can now be balanced:
- The user may then either:
- Select one of the balanced options (Fraction, Decimal or Whole Number) and accept the changes by pressing 'OK', or
- Reject the changes by pressing 'Cancel'


NOTES:
- When a species group is saved, users can use it again to define other reactions.
- The species groups can be managed via the Reaction Editor menu command Edit > Auto Complete Sets..
- If a species group is no longer required, press the Delete button to remove it.
- For a new group, simply change the name in the species group and modify the species in the group as we have done in Example 2 above.
- This functionality is especially useful when the user has a number of reactions that involve the same reagent and by-product.
- For example, using the SulfuricAcid species group (with additional species H2SO4(aq) and H2O(l)), we can simply drag in the main reactant and product, and the autobalancer will fill in the additional species from the species group:
- Please see Video Link for a video showing you how to set up and use a Species Group in the Reaction Editor.


Adding a New Source

| Number | Description |
|---|---|
| This table continues from the previous tables in Opening Existing Reaction Files and Defining a New Reaction, refers to the numbers listed in previous tables. | |
| Press the Add Other Button, select the Source radio button. | |
| |
| Select what the source should be treated as: Source only, Recycle only or Source and recycle. Please see Reaction Source for more information. | |
Adding a New Sink
This is similar to Adding a New Source. The differences are listed here:
- Click on Add Other and select Sink.
- Any species being used as a sink will have a
 icon displayed next to it.
 - You may only add a Sink once to a reaction file, but you can add multiple species to a single Sink.
- The Sink will always be the last reaction.
- Please see Reaction Sink for more information.
Adding Heat Exchange
- To add Heat Exchange, click on Add Other and select Heat Exchange.
- In the Heat Exchange box, select the appropriate option from the drop down list and then specify the value of associated variables depending on options chosen.
- These options are explained in Reaction Heat Exchange.
- Once reaction heat exchange is added to the unit, a new RHX tab will appear, where you can view and configure the reaction heat exchange settings.
- One advantage of using RHX (instead of EHX) to add or remove heat is that RHX operates in the same sequence as the RB sub-model. This helps avoid situations where part of the energy change is not accounted for, especially if the temperature moves outside the valid project temperature range.
Removing a Reaction, Source, Sink or Heat Exchange
- To remove a reaction, source, sink or heat exchange, simply select it in the reaction window and click Remove.
- If you only wish to disable the reaction, source, sink or heat exchange, clear the Enabled box at the bottom of the reaction window.
Specifying the Reaction Order
By default, SysCAD reactions are added sequentially. Alternatively, user can choose to specify two or more simultaneous reactions. Simultaneous reactions requires the Sequences Enabled option to be on.
- The reaction order is as they appear in the reaction file. To change the order of the reactions in the reaction file, select the desired reaction in the reaction window and click the up and down arrow buttons to move to the desired place in the reaction file.

Notes:
- If included, sources will always be first, sinks will always be last or second last and heat exchange will always be last (as shown above). These cannot be re-ordered.
- The reaction file in the picture shown above started with an existing reaction file, then new reactions, sink and HX options were added for demonstration purposes.
- Any reaction with "*" marked means it is new or has been modified, and the new information has not been saved yet
- If the reaction has been saved previously, and the order is now changed, then a number in (x) will shows the reaction order change. In the example above, the reaction 5 was saved as reaction 2 before the move.
- When the reaction file is saved, these markers will disappear.
Other Features
Right click on a reaction in the Reaction display panel will bring up the following pop-up options:

Most of the features have already been explained in previous headings. The remaining are explained below.
Clone a Reaction
The user may wish to clone a reaction when a very similar reaction is required. Select the required reaction in the reaction window and click Clone. A new reaction will be created at the bottom of the list which can be edited as for other reactions.
NOTE: when editing a cloned reaction, be sure to check and edit the extent species as this may have changed, especially if the "old" compound has been deleted.
Reversing a Reaction
A reaction may be reversed (swap Reactants and Products) by right-clicking the reaction and selecting Reverse Reaction. You may need to then update the extent settings depending on the extent type.
Copying Reactions from other opened files
Reactions can be easily copied from one reaction file to another using the Reaction Editor.
If the reaction files are in the same project, and they are both opened in the reaction editor, then
- With the Files pane open, drag the reaction to be copied with the left mouse, hold down and drop it into the other reaction file.

Copying from another instance of Reactions Editor
To copy a reaction from a reaction file in a different project, open the reaction files in a different instances of the Reaction Editor.
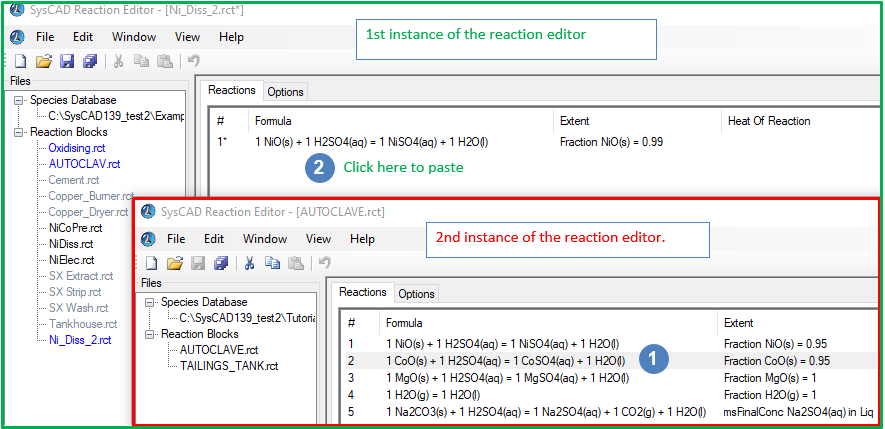
 Select the reaction to be copied, <ctrl+C> or right mouse click and select copy.
 Go to the other instance of Reaction Editor, right click on the reaction window of the desired reaction file and select paste.

NOTE:
- Existing Reaction Files can be opened from the SysCAD Reaction Editor without starting the SysCAD project.
- Start up the Reaction Editor from the start menu. Menu command <File> - <Open> and select the reaction file to open.
- Alternatively, with one instance of the reaction editor opened, Menu command <File> - <Open Folder> and select the reactions folder for a particular project. The files will be opened in another instance of the Reaction Editor.

Options Tab
For every reaction file there is a Options tab. Click on the tab to access the Options tab. An example is shown below.

This tab allows the user to enable the following:
Sequences Enabled
- This causes the reactions to be solved simultaneously, if required. This is NOT the recommended solution method - please see Reaction Block - Solving Reactions for more information.
- With the Sequences Enabled option ticked, each reaction will automatically be assigned a Sequence number of 1 - which means that all of the reactions are placed in sequence 1 and solved simultaneously.
- The user may change the sequence number of a reaction on the Reactions tab and hence create groups of reactions. Each group of reactions is solved simultaneously. In the example shown below, we have moved one of the reaction to a second sequence for demonstration purposes.
- Note that this does not affect Sources, Sinks and Heat Exchange. Source species will be added before the first sequence. Sink species will be removed and Heat Exchange will be performed after all sequences are solved.

Always Use First Reactant for Extent
- This allows the user to specify that the first reactant is always to be used for the extent for the reactions in this reaction file.
- Normally when a reaction is inserted the default extent species used is the first reactant, but the user may change this. If this option is enabled, then the user cannot change the extent species.
Description
- Add any comments to the description box for this reaction file.
- Any comments which were previously in a reaction file created without the Reaction Editor will be automatically moved to the description box. The date that the file was first saved using the Reaction Editor will automatically be noted in the description box as shown in the example above.
Troubleshooting
- If you are getting this error message during the reaction editor start up: "An item with the same key has already been added", it may be caused by issues with the species database definition. Please check the message window - species database tab for any errors. Please see general notes for more information.