Navigation: User Guide ➔ Menu Commands ➔ Project ➔ Print
Introduction
Some SysCAD windows can be printed via the Print command, these include:
- Printing of all the graphics windows - select a Graphics window as the active window and press Project - "Print" or "Print Multiple" or "Print Multiple PDF" (available in Build 139 or later).
- Printing of all the trend windows - select a Trend window as the active window and press Project, Print.
- Printing of the Access Window - a single instance of the access window can be printed from the Access Window - Options button - select Print from the Popup menu.
- Please note that the Access Window is printed by screen dumping of each tab page, so it will only print what can be displayed on the screen, so if the tab page is too long, it may not print all the information on the tabs.
The printing of SysCAD data can be done via SysCAD reporting (using external packages - MS Excel), please create SysCAD reports and print data tables using MS Excel.
Other SysCAD reference files such as reaction files, general control files can be opened and printed using text editors.
Print Setup
Command Path Project - Print - Print Setup or Window- Print - Print Setup
Used for setting up the current print/printer options.
NOTE
The default print setup for SysCAD is Landscape.
| Command Button | |
| Command Path | Project - Print - Print or Window - Print - Print |
| Shortcut Key | Ctrl+P |
Used for printing the Graphics Window graphics and Trend Window trends.
When print is pressed, SysCAD will print the information on the active window only.
- If the active window the Graphics Window, it will print the contents in view. That is, if the graphics page is in zoomed-in view, it will only print that portion. (See Print Multiple for other notes on printing graphics pages)
- If the active window is the Trend Window, the following pop up dialog will appear:
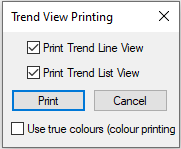
- The Trend Window is separated in two sections; the user can print out either the Trend Line View or the Trend List View or Both. If use true colours is selected, the user can print out the Trend lines in colour if colour printing or in shades of grey if using a black and white printer.

Please NOTE that the Access Window cannot be printed from this command. To print the Access Window contents, open the Access Window for a selected Unit Operation, and select print from the Access Window Options button. When printed, each tab page will be on separate pages.
Hint:
Printing the file \SysCAD\SCD_Log.csv can print the error messages in the Message Window.
Print Multiple
| Command Path | Project - Print - Print Multiple or Window - Print - Print Multiple |
| Shortcut Key | Ctrl+Shift+P (Build 138 or earlier) |
- Used for printing single or multiple Graphics Window pages.
- If using "Microsoft Print to PDF" printer driver, the graphics will be printed in one colour depth. (Colours may appear different if using other printer drivers.)
- This function will print each graphics page as they appear on screen, thus if a graphics page is in the zoomed-in view, then only the "zoomed-in" section will be printed.
- User can change the header text from Tool - General Options - Graphics - Title text options for printed graphics.
- The header (margin) can be set by changing the value of: Tool - General Options - Graphics - Factor for graphics border margins.
- Select any graphic page to be the active window to enable this command. User will then be given a dialog box to select any number of the graphics pages to be printed.
- After selecting the required graphics pages for printing, press the "Print" button and select the printer and printer properties.
- If a PDF printer is selected, then user may need to enter the file name / location for each graphics page. (The behaviour described here is for the "Microsoft Print to PDF", other printer driver may behave differently.)
- Recommend using this function for printing hard copies. For printing to PDF, recommend using the "Print Multiple PDF function", available from Build 139.
Print Multiple PDF
| Command Path | Project - Print - Print Multiple PDF or Window - Print - Print Multiple PDF |
| Shortcut Key | Ctrl+Shift+P (Build 139 or later) |
Available from Build 139. NOTE: This is recommended method if printing to PDF.
- Used for printing multiple Graphics Window to PDF format, using the "Microsoft Print to PDF" printer driver. IMPORTANT: This function requires the "Microsoft Print to PDF" printer driver to be installed, without this printer driver, this function will not proceed.
- Any graphics page must be active to select this command. User will then be given a dialog box to select any number of the graphics pages to be printed.
- All graphics pages will be printed in the "zoom all" view, if user wish to print a "zoomed" in view, please use the Print command.
- User can change the header text from Tool - General Options - Graphics - Title text options for printed graphics.
- The header (margin) can be set by changing the value of: Tool - General Options - Graphics - Factor for graphics border margins.
- This function ignores the Printer setup, user can only change parameters giving in the "Multi Print to PDF Selection" dialog box, as shown below:
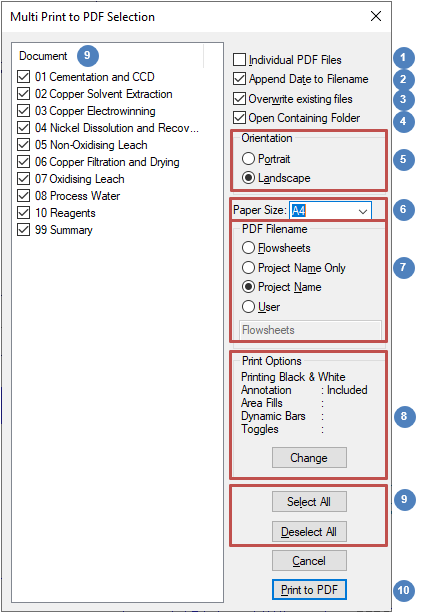
Multi Print to PDF Selection dialog box:
- "Inividual PDF Files" checkbox:
"unchecked" - all flowsheets will be printed as one document;
"checked" - each flowsheet will be printed separately. Graphic page names will be used as file names. - "Append Date to Filename" checkbox:
"checked" - date will be appended to the file name, e.g.: "Demo Nickel Copper Project(07-Dec-2020).pdf" or "03 Copper Electrowinning(07-Dec-2020).pdf" - "Overwrite existing files" checkbox:
"checked" - overrides the existing file. Please make sure the existing file is NOT opened before pressing "Print to PDF", if the file is opened, this command will fail.
"unchecked" - if the file exists then an error message will be given in the message window: "PDF file exists. ("filename"). Print to PDF cancelled. Do not overwrite existing files. - "Open Containing Folder" checkbox (available from Build 139.32925):
"checked" - Windows Explorer will be opened displaying the Print folder after Print to PDF has been completed. - "Orientation": Portrait or Landscape.
- "Paper Size": Several paper sizes are available.
- "PDF Filename" (used to create the filename when printing all flowsheets to a single file)
"Flowsheets": file name will be: "Flowsheets.pdf"
"Project Name Only": uses the project name as the file name. Eg: "Demo Nickel Copper Project.pdf"
"Project Name": uses the project name as part of the file name. Eg: "Demo Nickel Copper Project Flowsheets.pdf"
"User": User can enter the name of the PDF file into the filename box, without extension. Eg: entering "Project123" will create the file "Project123.pdf". - "Print Options" (available from Build 139.33457): The print options as selected in General Options Graphics are displayed here. To make changes to the print options, press the "Change" button to go to General Options Graphics tab.
- Use "Select All" or "Deselect All" buttons to quickly select or deselect all the graphic pages.
- Press the "Print to PDF" button to execute the print job.
- "Inividual PDF Files" checkbox:

- The printed documented will be added to the "current project\Print" subfolder.
- Please check the message window for feedback printing messages.
The advantages of this command over the Print Multiple are:
- user can print all pages to one file.
- user does not have to enter file name for each flowsheet if printed separately.
NOTE:
- When printing a large file (many flowsheets), it may take a while for the PDF document to get generated, if the file is showing 0 KB, check again in a few minutes.
Print Preview
Command Path Project - Print - Print Preview or Window - Print - Print Preview
This is currently not available for use.