Change Tag
Navigation: User Guide ➔ Windows ➔ Access Window ➔ Change Tag
| SysCAD Tags | Copy and Paste Tags | Change Tag | Data Transfer |
|---|
Introduction
Each unit and link in SysCAD has a unique name, or Tag. Users may change the tag for an individual unit, or they may change a number of tags together using the Bulk Change Tag command.
Notes:
- SysCAD tags are NOT case sensitive, hence 'Makeup_water' is equal to 'MAKEUP_WATER'
- SysCAD tags cannot have spaces, but if you enter a tag with spaces, SysCAD will automatically change them to '_'.
- Please refer to Model Tag Naming Rules for more information.
- The Change Tag command will also result in tags changes to all PGM files in the project if the "Apply Tag Change in PGM files" tickbox has been selected from the General Options Project dialog box.
- The Change Tag command will also result in tags changes to all CSV and TXT files in the project if the "Apply Tag Change in CSV and TXT files" tickbox has been selected from the General Options Project dialog box.
Video Link
- Please see this Edit Tag Displays video for a demonstration of 'Change Tag' command.
- Please see this Bulk Tag Change video for a demonstration of the bulk tag change commands.
Change a Single Tag
To change the tag for a single unit:
- Right click on the unit and the Access window for that unit will be displayed:

- Click on the
 button;
- Old Tag will display the unit's current tag and the user may type in the required tag into New Tag.
- The required tag cannot contain spaces, tabs, dots or other special characters. Please see Model Tags for the tag naming rules.
- Press OK to change the tag. The tag will be changed in the model and any other place where it is referred to within SysCAD, such as Controllers and trend windows.

Bulk Tag Change
| Command Path | Edit - Bulk Tag Change |
(The user may also access this command by right clicking on 'Graphics' in the Explorer Window)
Bulk Tag Change Option
This allows you to change multiple unit models' tag names. A dialog box will be shown and the functions of the dialog box will be:
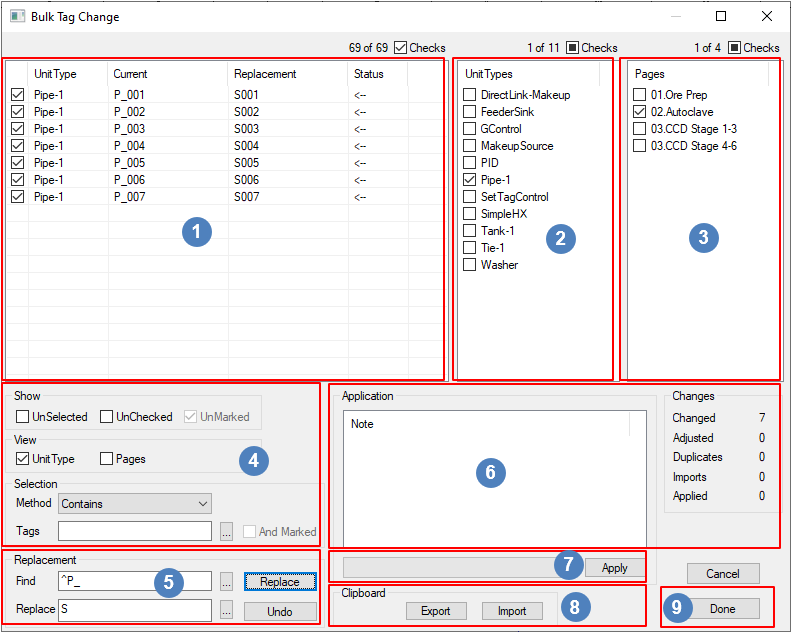

Selected Tags Status |
This section shows the list of unit tags in the project:
Notes:
| |
Unit Classes |
This section allows the user to select the unit models that will be displayed in section Only units that are ticked will be visible. So, in the above image, only the Pipe-1 unit class has been ticked, and hence only pipes are displayed. | |
Pages |
This section allows the user to select the graphics pages of interest. The tags displayed in section | |
Filters |
This group contains various filters the user can apply to quickly find the relevant tags to be changed. | |
Find and Replace Functionality |
This section allows the user to change multiple tags based on selected rules. NOTE: The Replace button will act as a request to change tags only, it does not actually change the tags in the database:
| |
Change Tag Feedback |
This section gives feedback information on the change tag process. | |
Apply Changes |
The APPLY button will only be available if tag change requests are present with no duplicate tags. Once the user has pressed the APPLY button, the SysCAD tags will be changed. NOTE: There is NO undo option after the tag changes are applied. The User can only return to previous version of the tags by exiting (and not saving) the project. | |
Export and Import Tags |
| |
Done and Cancel |
To close the dialog box, press 'Done'. The Cancel button will NOT undo any changes that have already been applied, i.e. the 'Apply' button has been clicked. However, if the user has NOT clicked on the 'Apply' button, then any proposed changes will be discarded. Note: The Bulk Change Tag command will also result in tags changes to all PGM files in the project if the "Apply change tag in PGM & MP files" tickbox has been selected from the General Options - Project Tab. |
Using Regular Expressions
The simple replace methods are generally satisfactory, but there are situations where you need more powerful techniques, and regular expressions (RE's) can do pretty much anything.
Suppose we have pipes with tags P_1, P_2, P_3,.... P_10, P_11 and so on. Now if you list these in lexicographic order in a report, then P_11 will come before P_2!. What we should have done is number the pipes P_01, P_02 and so on to ensure a numerical ordering.
Now if we just do a simple replace of each '_' with '_0', then we end up with P_01, P_02, .... P_011, which doesn't help. So we want to replace the '_' with '_0' only when there is a single digit. We can do this very easily using REs, because they can capture parts of the search result.

The RE 'P_(.?)$' means "match an underscore followed by at most one character before the end of the string". The brackets capture the corresponding part of the string into a group, that we can then use in the subsequent replace operation.
In the replace string, we insert '_0', followed by the result of the capture group. '$1' refers to the first capture group. (We can have multiple groups)
Using the capture technique, you can transform the tag in just about any way imaginable. There are a lot of other capabilities, such as ways of selecting only characters from different classes (such as digits or non-alphanumeric).
- Note that there are various 'flavours' of RE's with slightly different grammars; the implementation in SysCAD uses ECMAScript.
- A good summary of the rules is here: [1] There are any number of tutorials available, if you haven't used RE's before, start with one of these.
- RE's are a valuable technique for anyone doing serious programming or text editing and many editors and IDE's (such as Visual Studio) have inbuilt RE capability.
See also: Regular Expression Syntax
HINT: To bring all the tags to 3 digits, after the above is applied. Repeat and search for tags with 2 digits, using P_(..?)$ as the expression.
Import Export Example
- STEP 1: Press Ctrl and select a group of tags on Section
 and Press Export (This will add the group of tags from SysCAD to the clipboard)
|
|
- STEP 4: Select all the cells in the Excel table including Headings and Press Copy (or Ctrl+C) (This will add the group of tags from MS Excel to the clipboard)
- STEP 5: Activate SysCAD and press Import
 .
.


Bulk Change Tag
| Command Path | Graphic - Bulk Change Tag |
This command is almost identical the Edit - Bulk Tag Change, the difference is documented below.
When this command is selected, it opens a pop up toolbar allowing user to select the required models for change tag.

- Single left click on a unit will select/deselect it, click on each units that requires tag change, alternatively
- Use the InWindow or CrossWindow buttons to draw a box around all the units that require tag change to select them.
- Press the Tick button to open the "Bulk Tag Change" dialog box.

- The user selected unit models will be Marked with a dot next to the tick box in Section
- The And Marked tick box is now usable, showing only the Marked units in section Replacement column.