Archive Editor
Navigation: User Guide ➔ Reports ➔ Archive Reporter ➔ Archive Editor
| Archive Reporter | Archive Editor | Archive (sac) File Text Format |
|---|
Introduction
The Archive Editor is used to define the user requirements for the Archive Reporter in a text (sac) file.
The user specifies how many tables of data are required, the frequency of reporting and the tags that are reported in each table.
To launch the Archive Editor, press the Edit button on the Project Settings Archive tab page.
Archive Tab Page
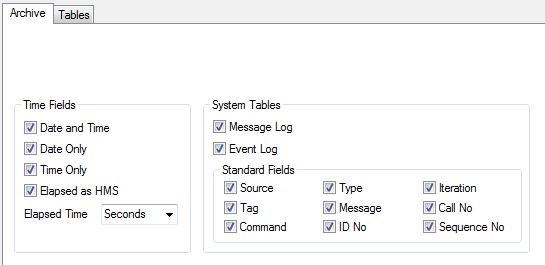
For each option, the user can select or deselect by left mouse click on the tickbox. For Elapsed Time, choose the preferred option from the dropdown list.
Refer to System Settings for more detail on these options.
Tables Tab Page

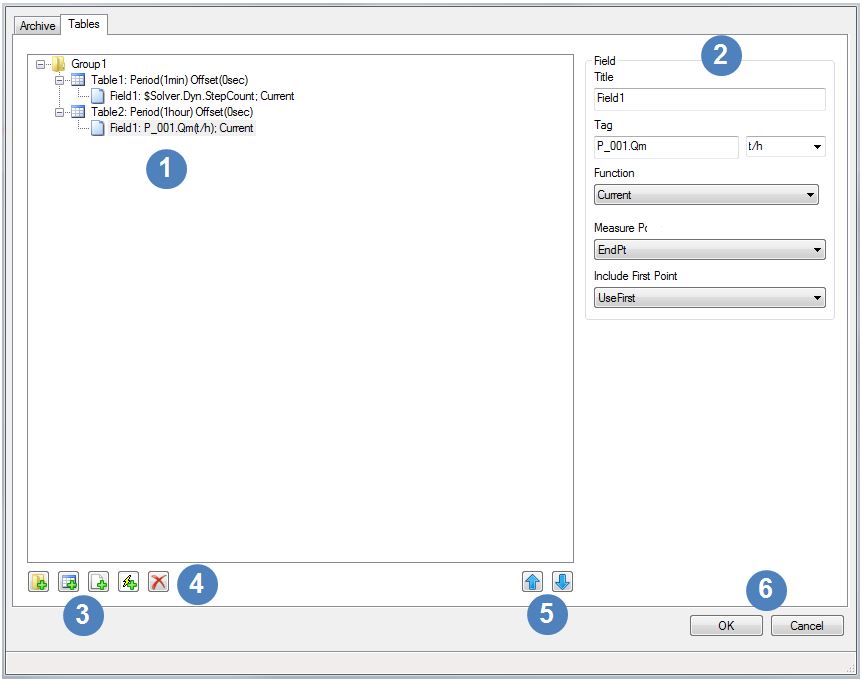
All of the current Groups, Tables, Triggers and Fields are shown in a tree-view list on the left hand side of the tab page. Groups and Tables can be expanded or compressed to show or hide their contents. When you click on an item in the list the parameters for that item become visible for viewing or editing (see next entry). 
The list of parameters for the item that is selected in the list on the left hand side are shown on the right hand side. In the above list, Field 1 of Table 2 is selected. The parameters for Groups, Tables, Triggers and Fields are explained in the following sub-sections. 
The four buttons in the bottom left hand corner are used to add new items:
 Add Group button, refer to Groups
 Add Table button, refer to Tables
 Add Field button, refer to Fields
 Add Trigger button, refer to Triggers

 Delete button. Will delete the currently selected item, including Fields and Triggers. If a Group or Table is deleted then all items within those will also be deleted. If the last Table in a Group is deleted then the Group will also be deleted.
Note: If items are deleted by mistake, press the Cancel button to go back to the previously saved configuration.
 The Up and Down arrows allow the user to change the order of Fields within a Table.

Once you have completed making changes to the Archive configuration, press the OK button. To go back to the previously saved configuration, press the Cancel button.
Groups
Tables with the same format can be grouped together.
To add a group, left mouse click on the Add Group ![]() button in the bottom left corner of the dialogue box. A new group will contain one new table. To remove a group, select the group and press the Delete
button in the bottom left corner of the dialogue box. A new group will contain one new table. To remove a group, select the group and press the Delete ![]() button in the bottom left corner of the dialogue box.
button in the bottom left corner of the dialogue box.
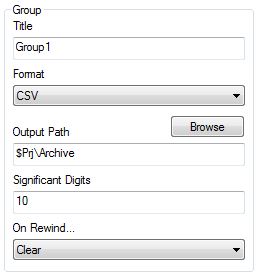
The following dialogue box will be available on the right hand side of the Tables tab page to allow configuration of the group:
- The group can be given a title by entering it into the Title box. Group titles must be unique.
- The chosen format is selected from the dropdown list of available options.
- If the CSV or TXT file options are selected then the user can also specify the output path, number of significant digits and On Rewind (Clear) specification. Note that the number of significant digits will be ranged between 2 and 17.
- Refer to Reporting Options for more detail on these options.
Tables
A separate table of data can be created for each set of data that is required to be saved in a single table or file with the same reporting options (period or triggers).
To add a table, select anywhere within the group that the table is to be a part of and left mouse click on the Add Table ![]() button in the bottom left corner of the dialogue box. If a new Group is required, then left mouse click on the Add Group button and a new group with a new table will be created. To remove a table, select the Table and press the Delete
button in the bottom left corner of the dialogue box. If a new Group is required, then left mouse click on the Add Group button and a new group with a new table will be created. To remove a table, select the Table and press the Delete ![]() button in the bottom left corner of the dialogue box. If all tables in a group are deleted, then the group will also be deleted.
button in the bottom left corner of the dialogue box. If all tables in a group are deleted, then the group will also be deleted.
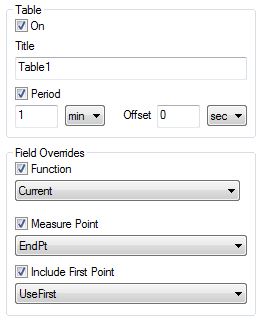
The following dialogue box will be available on the right hand side of the Tables tab page to allow configuration of the table:
- The table will be created if the On box is ticked.
- The table can be given a title (or name) by entering it into the Title box. The names of tables must be unique.
- To define a period for reporting, tick the Period button and specify the value of the period and offset, including the units of time using the dropdown lists.
- Refer to Reporting Options for more detail on these options.
Notes:
- Use Period for reporting at fixed time intervals, OR use Triggers for reporting at irregular time intervals (i.e. report specified fields based on trigger logic).
- If one or more Triggers are used, a period & offset is not relevant or required.
- Periods and Triggers can both be used in a single table
- The maximum number of tables allowed is 500.
Field Overrides
Each field can have different functions, measure points and first point options. The field override options allow these to be specified once if any of them are all the same for all fields in the same table. Refer to Field Options for more detail on these options.
Triggers
The user may specify one or more Triggers that will cause the values in the table to be reported. There can be any number of triggers. If the conditions of any of the triggers are met, then the fields will be reported.
To add a trigger, select anywhere within the table that the trigger is to be a part of and left mouse click on the Add Trigger ![]() button in the bottom left corner of the dialogue box. To remove a trigger, select the trigger and press the Delete
button in the bottom left corner of the dialogue box. To remove a trigger, select the trigger and press the Delete ![]() button in the bottom left corner of the dialogue box.
button in the bottom left corner of the dialogue box.
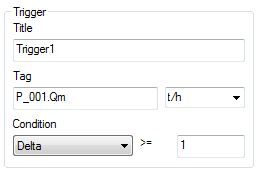
The following dialogue box will be available on the right hand side of the Tables tab page to allow configuration of the trigger:
- The trigger can be given a title (or description) by entering it into the Title box. The names of triggers do not have to be unique.
- Enter or paste the required SysCAD tag for the trigger into the Tag box. If the tag has conversion units, different units from the same family can be chosen using the dropdown list.
- Choose the required condition from the dropdown list and specify a value to test.
- Refer to Trigger Options for more detail on these options.
Notes:
- If one or more Triggers are used, a period & offset is not relevant or required.
- Periods and Triggers can both be used in a single table
Fields
The user may specify one or more Fields to be reported.
To add a field, select anywhere within the table that the field is to be a part of and left mouse click on the Add Field ![]() button in the bottom left corner of the dialogue box. To remove a field, select the field and press the Delete
button in the bottom left corner of the dialogue box. To remove a field, select the field and press the Delete ![]() button in the bottom left corner of the dialogue box.
button in the bottom left corner of the dialogue box.
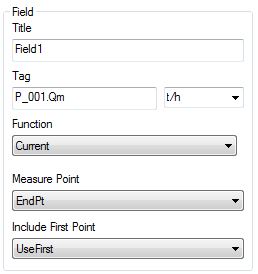
The following dialogue box will be available on the right hand side of the Tables tab page to allow configuration of the field:
- New fields are added at the bottom of the list of current fields. The up and down arrows
 in the bottom right of the dialogue box allow the user to rearrange the order of the fields within a table as desired.
 - The field can be given a title (or name) by entering it into the Title box. The names of fields within a table must be unique.
- Enter or paste the required SysCAD tag to be reported into the Tag box. If the tag has conversion units, different units from the same family can be chosen using the dropdown list
- If the field override for function has not been used then the user can choose the required function from the dropdown list, and where relevant, specify any other required values.
- If the field overrides for the Measure Point and First Point options have not been used, then the user can select the required option from the relevant dropdown lists.
- Refer to Field Options for more detail on these options.
- The maximum number of fields allowed per table depends on the database format. For db3 format the limit is 2000, for csv format the limit is 3000.
