Plant Model - Flowsheets

From SysCAD Documentation
Jump to navigation Jump to search

Navigation: User Guide ➔ View ➔ Plant Model ➔ Flowsheets

FlwSolve Tab Settings Tab Audit Tab Project Tab RC Tab Species Tab Views Tab Soluble Tab WaterQuality Tab Qualities Tab
Environment Tab System Tab ModelList Tab Flowsheets Tab PrjNetworks Tab Status Tab Statistics Tab States Tab EvalSeq Tab Globals Tab

Introduction

This tab page displays a list of graphics pages associated with the project and allows the user to create different 'Areas' in the project. Each flowsheet may be assigned to an Area created by the user.

The list of flowsheets is built dynamically after a project load. The user may then assign the flowsheet to an Area or activate/deactivate a graphics page either manually, via PGM, via SetTagList or externally via Excel reports or macros.

Plant Areas

The easiest way to manage Areas and Flowsheets is from the Explorer Window.

The user may add any number of Areas to the project, by clicking on the Button - Add New Area.png button. The user may change the names of all new areas. For example:

AddNewAreaExample.png

If the 'AllowSubAreas' option is enabled, then areas can be assigned to other areas, becoming sub-areas:

SubAreaExample.png

Once a new Area has been added to the project, the user may assign any of the existing flowsheets to that area. They do this by selecting the required area from the drop down list at the right of the 'List of Graphics Flowsheets'. For example:

GroupFlowsheetExample.png

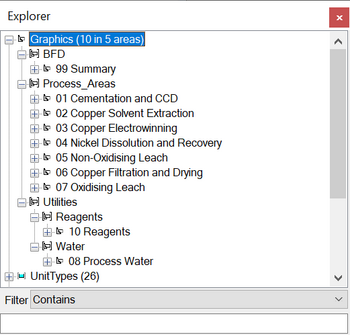
Flowsheets will be grouped by Area in the Explorer Window, making it simpler to navigate around large projects with many flowsheets. For example:

ExplorerSubArea.png

All flowsheets in an Area can be Deactivated or Activated as a group. Clicking on the Button - Activate.png or Button - Deactivate.png button for the chosen area will activate or deactivate all the flowsheets in the single area. See also Group Operations for how to apply changes to multiple areas.

To activate or deactivate a single area via PGM, SetTagList or externally, right click on the Button - Activate.png or Button - Deactivate.png button for the chosen area, select "Copy Full Tag" or "Copy Tag for PGM", then paste the command into the external file.

Recommended ways to activate/deactivate area(s) from within SysCAD:

Graphics Flowsheets

A flowsheet can be Deactivated or Activated. Clicking on the Button - Activate.png or Button - Deactivate.png button for the chosen flowsheet will activate or deactivate the flowsheet.

NOTES:

  1. The pages are sorted alphabetically.
  2. A single flowsheet Activate/Deactivate can be performed directly from the the Explorer Window.
  3. Multiple flowsheet/area Activate/Deactivate can be performed using Group Operations. This is the easiest way to activate/deactivate flowsheets.
  4. To activate or deactivate a single flowsheet via PGM, SetTagList or externally, right click on the Button - Activate.png or Button - Deactivate.png button for the chosen flowsheet, select "Copy Full Tag" or "Copy Tag for PGM", then paste the command into the external file. It is recommend that the Button - Activate.png or Button - Deactivate.png buttons in the first table (by flowsheet name) are used. These tagnames will remain valid if new flowsheets are added or other flowsheets are deleted. The tag name will require updating in the external file (PGM/csv/Excel) if the flowsheet name is changed.
  5. If using General Controller (PGM) to activate/deactivate flowsheet(s), please place the code inside the InitialisePreStart trigger subroutine.

Data Sections

Tag (Long/Short) Input / Calc Description / Calculated Variables / Options
Plant Areas (Groups of Graphics Flowsheets)
AddArea Button - Add New Area.png When the user clicks on this button a new Area is added to the project. The user can rename the Area in the fields below.
AreaCount Display Displays the number of areas in the project.
AllowSubAreas Tick Box If the user enables this, then areas may have sub-areas. (This is only active if the project contains 2 or more areas).
AllowUnassigned Tick Box If the user enables this, then flowsheets do not have to be assigned to an area. If this is not enabled, then all flowsheets will be assigned to an area (by default, to the first area).
Area. The Area table shows all of the areas in the project. The functionality for each column in the table is described below.
Area Display Each Area has a row - starting with Area1.
Name Input The user may enter the name for each area. It is a good idea to use a combination of numbers and words, so that the areas are ordered in a logical sequence in the Explorer Window. For example, 01_CrushingArea, 02_MillingArea, 03_LeachingArea, etc.
Group Drop Down List This column is only visible if the user has ticked 'AllowSubAreas'. This allows an area to be specified as a sub-group of an existing group. The user selects the higher level group from the drop down list. In the Explorer Window this group will then be displayed as a sub-group of the higher level group.
Lvl Display This column is only visible if the user has ticked 'AllowSubAreas'. The area level is displayed as a point. The highest level areas have a single point, the next level shows 2 points, then 3, etc.
Delete Button - Delete.png If the user clicks on the Delete button, then that area will be removed from the project.
Note: Any flowsheets that were grouped in the deleted area will NOT be deleted.
When 'AllowUnassigned' is NOT enabled, this button will not be available for Areas with at least 1 page (flowsheet). Users should reassign all flowsheets in the area to be deleted to other areas prior to deleting the area.
Pages Display The number of flowsheets that are grouped in the Area.
IsActive Display If the area is active, this column will display a '1' or ticked box, otherwise for deactivated flowsheets a '0' or empty box will be displayed.
Act Button - Activate.png The user may click on this button to Activate the area. If the button is greyed out, then the area is already Active.
DeAct Button - Deactivate.png The user may click on this button to Deactivate the area. If the button is greyed out, then the area is already Deactivated.
Active Display The number of active nodes, or units, in the area.
Nodes Display The total number of nodes in the area.
Graphics Flowsheets
PageCount Display Total number of flowsheets in the project.
List of Graphics Flowsheets accessed by TagName. This table displays all of the flowsheets in the projects, ordered by their Tag Name. Each column is described below.
Page Display Page[TagName]
IsActive Display If the flowsheet is active, this column will display a '1' or ticked box, otherwise for deactivated flowsheets a '0' or empty box will be displayed.
Act Button - Activate.png The user may click on this button to Activate the flowsheet. If the button is greyed out, then the flowsheet is already Active.
DeAct Button - Deactivate.png The user may click on this button to Deactivate the flowsheet. If the button is greyed out, then the flowsheet is already Deactivated.
Active Display The number of active nodes, or units, on the flowsheet.
Nodes Display The total number of nodes on the flowsheet.
Area Drop Down List The user may select the Area for the flowsheet. If 'AllowUnassigned' is ticked, then selection of "None" is available.
List of Graphics Flowsheets accessed by Index. This table displays all of the flowsheets in the projects, ordered by their Index, or page number. Each column is described below.
Page Display A list of the flowsheets, shown as Page1, Page2, etc.
IsActive Display If the flowsheet is active, this column will display a '1' or ticked box, otherwise for deactivated flowsheets a '0' or empty box will be displayed.
Act Button - Activate.png The user may click on this button to Activate the flowsheet. If the button is greyed out, then the flowsheet is already Active.
DeAct Button - Deactivate.png The user may click on this button to Deactivate the flowsheet. If the button is greyed out, then the flowsheet is already Deactivated.
Active Display The number of active nodes, or units, on the flowsheet.
Nodes Display The total number of nodes on the flowsheet.
Name Display The flowsheet name, as it appears in the Explorer Window.
TagName Display The tag name of the flowsheet.
Area Drop Down List The user may select the Area for the flowsheet. If 'AllowUnassigned' is ticked, then selection of "None" is available.