Adding and Executing Excel Reports
Navigation: User Guide ➔ Reports ➔ Excel Reports ➔ Adding and Executing Excel Reports
| Excel Automation | Export Reports | Import Data | Trend Data | Information Report | |||
|---|---|---|---|---|---|---|---|
| Excel Report Summary | Adding | Executing Report | Get Tag Report | Tag Select Report | Quick View Report | Set Tag Report | Trend Report | General | Species Info |
Latest SysCAD Version: 19 March 2024 - SysCAD 9.3 Build 139.35102
Related Links: Example SysCAD Excel Reports
Steps in Creating a Report
The steps required to successfully run a SysCAD report in any form are as follows:
- Create a SysCAD report in Excel. User can use one of Example SysCAD Excel Reports or Default Reports as template.
- Once the Excel report is set up and saved, open the Reports dialog box in SysCAD via Tools - Reports, using the icon
 , or the shortcut keys CTRL + R. This action will open the Excel Automation: Export Reports and Import Data Dialog Box.
 - There are 2 different types of reports:
- To send data from SysCAD to Excel, add the Excel report to the 'Export Reports' tab;
- To import data from Excel into SysCAD, add the Excel report to the 'Import Data' tab.
- Add the new report that has been created by clicking on the 'Add' button in the appropriate tab and browsing for the new report - see Add a report to the dialog box.
- Once the report has been located, click the 'OK' button and you will see the report has been added to the Reports dialog box.
- The report can now be accessed by SysCAD:
- If it is on the 'Export Reports' tab, click on the 'Generate' button and SysCAD will send data to the Excel report;
- If it is on the 'Import Data' tab, click on the 'Process' button and SysCAD will import data from Excel to SysCAD.
- SysCAD accesses Excel using COM Automation:
- If Excel is not started, SysCAD will start it and make it the active application.
- If more than one copy of Excel is opened, SysCAD uses the first copy it finds.
- SysCAD will then search for the report file:
- If the file is already opened and saved, it will be used for the report.
- If the file is opened and has been changed and NOT saved, SysCAD will return an error message prompting the user to save the Excel spreadsheet and try again.
- When SysCAD has finished generating or processing the reports, it saves the spreadsheet. Any errors encountered will be reported in the Excel spreadsheet.
- The report is now ready for reviewing.
NOTES:
- Always save the Excel spreadsheet before using SysCAD reporting.
- Any fields from a Deactivated flowsheet will be reported as a '*'.
- SysCAD reporting becomes EXCESSIVELY slow if Excel is in "page break view". Please make sure the spreadsheet is in normal view while a report is being generated.
- Do not edit a spreadsheet while SysCAD is busy writing to it, as the report generation will be cancelled. Use the Lock Excel while generating option to avoid accidentally stopping the reporting. See Excel Reports Dialog Box - Options Tab.
- Reports may be generated while SysCAD is running or solving. However, it is recommended that reports be generated when SysCAD is stopped as it is faster and the values obtained will be synchronised (i.e. if SysCAD is running values may be obtained from different iterations).
Excel Automation: Export Reports and Import Data Dialog Box
The "Excel Automation: Export Reports and Import Data" function can be accessed as follows:
| Command Button | |
| Command Path | Tools - Reports |
| Short Cut Key | Ctrl+R |
Adding an Excel Report to SysCAD
With the Excel Automation: Export Reports and Import Data dialog box open, the user may call an existing SysCAD Excel report by adding it to the appropriate tab page. That is,
- a SysCAD GetTag report must be added to the Export Reports Tab and
- SetTag Report must be added to the Import Data tab and so on.

 When the Add button is pressed, it opens the following dialog box, note this was opened from the Export Reports tab. The dialog box may be slightly different if the Add button was pressed from one of the other Tab pages.
 The user may use the Browse button to find the MS Excel workbook containing the SysCAD report.
 The Report name may be entered if user wants to produce only one report within the Excel Workbook.
- Note that this is not the workbook or worksheet name of the Excel report, but the report name parameter inside the SysCAD keyword.
 Press OK to close this dialog box and return to the Excel Automation: Export Reports and Import Data dialog box.
Default Reports
- For every project, the first time the Excel automation is access, two reports will be added automatically to the project\Reports folder:
- 02GeneralReport.xlsx
- 04DetailedReport.xlsx
- These reports can be used as quick reports or as starting point for your own customised report.
- The 02 GeneralReport is set up ready to be used by any project,
- The 04Detailed report needs minor input from the user before using, please see Default Reports for more information.
- To use these reports, after the project is solved, select the report you would like to execute and press the "Generate" button.
- As these are general reports, they may include features not used by the project. You can always save the finished report in another name and modify / delete any worksheets to suite your project.
Report execution Types and Options
The different tabs on the SysCAD Report dialog box are described in the following sections.
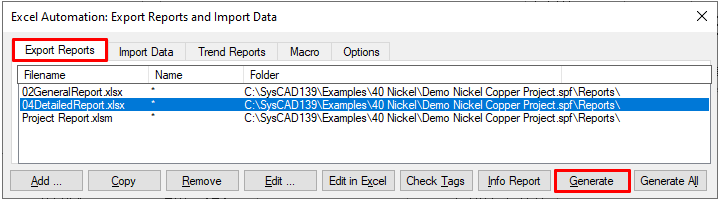
Export Reports Tab
- Use this Tab to Transfer SysCAD Data to MS Excel.
- By default, two reports will be added to this tab the first time you access the Excel Automation command, these are described in the previous heading and in Default Reports.
- To execute an Export Data report, select the workbook (and report name) you would like to export the data to, and press the Generate button.

| Columns: |
|
| Buttons: |
|
Import Data Tab
- Use this Tab to Import Data from MS Excel to SysCAD.
- To execute an Import Data report, select the workbook (and report name) you would like to import the data from, and press the Process button.

| Columns: |
|
| Buttons: |
|
Trend Reports Tab
- Use this Tab to generate Trend Reports in MS Excel (mainly for dynamic simulation).

This is as per the Export Reports Tab
NOTE: This is an outdated feature. We recommend using the Archive Reporter for dynamic project reports. The archive reporter is significantly faster, has more inbuilt reporting & calculation options and does not require tags to be recorded in the data historian.
Trend Windows are still highly recommended for Dynamic projects, but the trend reports should be built from the archive results, which involves importing the archiver output files into Excel, often through a macro, for data analysis and graphing. For more information, please see Archive Reporter.
Macro Tab
- Use this Tab to execute Excel Macros.
- To execute a macro, select the workbook containing the macro, to press the Execute button. Alternatively, macros can be executed directly from MS Excel, see Project Report for an example.

| Columns: |
|
| Buttons: |
|
Options Tab
- Use this Tab to set various SysCAD report options.

Note: If the option Update remote and external references when opening Excel file is selected, any excel files containing links will be updated upon opening.
Right Click Pop Up Options
Right clicking on any entries on the Excel Automation: Export Reports and Import Data dialog box will bring up the following pop up list:

For most of the options on the pop up list, they are simply an alternate method to access the same functionality as the buttons on the various tab pages.
Executing an Excel Report
There are a number of ways to execute the SysCAD reports:
- The easiest is to press the Generate / Process button with the Excel Automation: Export Reports and Import Data dialog box open. This button will call the Excel automation functions to transfer the data between Excel and SysCAD. NOTE: data is not linked between the two software packages, transfer will only happen once whenever this button is pressed.
- Execute from a SysCAD Script file.
- Execute via COM Automation
- Set up the report to be called from a SysCAD Task Model.